Bringing back the old ways of homesteading
Homesteading is becoming more and more popular as people learn some of the homesteading skills used in the past to become more frugal, self-sufficient, and live off the land.
Being more reliant on proceeds from earth, land and home are cherished principles of the past. A lot of these skills are dying out as much of the world becomes more reliant on store-bought food and reliant on modern food technology systems.
There are various levels of homesteading, as not everyone lives in the countryside, so there’s a lot of ‘urban homesteading’ trends that mix with urban life. In this post we look at the most important homesteading skills that you should know, whether you live in an urban or country area.
6 Old-Ways Homesteading Practices
No matter what your lifestyle is, it is important to keep these heritage skills and self-sufficient practices alive. Here are 6 heritage skills and practices that should be revived and kept alive.
Homesteading Skill 1: Growing your own food
It makes sense that this is the first on my list. The very foundation of homesteading is producing your own food.
While that may take additional forms, such as as hunting, fishing, and animal husbandry, gardening, and the growing of produce to feed you and your family is a critical skill that most people don’t have. Just plunking something in the ground and hoping is not gardening.
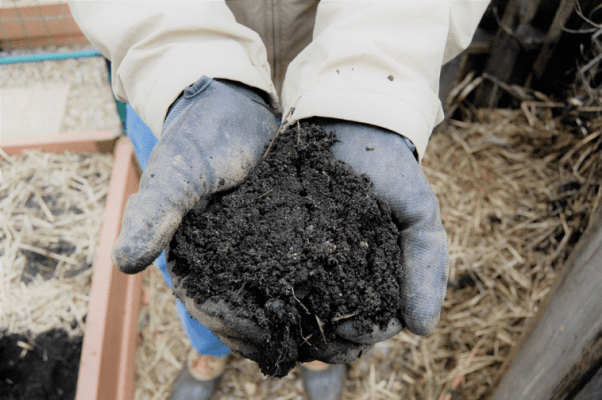
To be a successful gardener and to grow enough food to feed yourself takes a good understanding of soil conditions, temperature, nutrient levels, and moisture levels. After all, a gardener focusses on healthy plants, an even better gardener will focus on how to have healthy soil.
One must also have observational skills to observe changes in seeds, seedlings, and plants as they mature to fend off infestation and diseases that can decimate a crop.
In addition, one has to know how to fend off problems without relying on hazardous chemicals. Knowing what kind of natural and biological controls can be employed to safeguard your harvest is an essential homesteading skill.
A successful gardener must also understand seed germination ratios to know when seeds are viable. They also have to know the timing of germination, growth, and maturation of plants so they know when to expect harvests and when to replace crops with the next to get harvests all season long.
It is important for gardeners to know what crops grow in their conditions to best advantage. The French refer to it as “terroir”, and it is the set of all environmental factors that affect a crop, including unique environment contexts, farming practices, and a crop’s specific growth habitat. Collectively, these contextual characteristics are said to have a character. A tomato grown on my land may grow and taste different than one grown on a farm in another region.
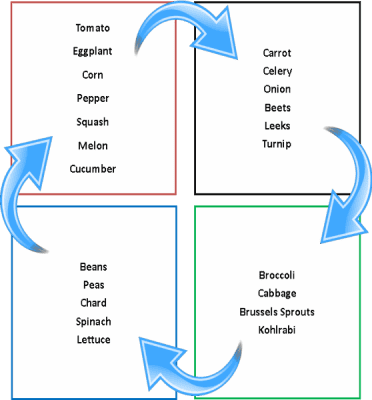
Another observation and documentation skill is crop rotation. Plant borne pathogens can grow and soil can become very depleted in a mono culture situation, so a planned rotation of crops can reduce soil contamination and prevent the loss of specific minerals and nutrients.
Entire books are written on the topic of gardening so there are always new things to learn, these are just a few to get you started. Always keep learning new gardening skills! Lets move on.
Homesteading Skill 2: Preserve food without using energy
Once you grow and harvest your food, there is the process of storing and preserving it. Most crops come in gluts, a period when all of one crop or certain types of crops have matured and there is an overabundance. Assuming you cannot consume all of it at once, you must have methods in which to store and or preserve food.
The typical way is through modern refrigeration and freezing technology. But this is a relatively modern technology. Refrigerators for home use were invented in 1913. In 1923 Frigidaire introduced the first self-contained unit. Ice boxes were used prior to that, but briefly. In the long history of agriculture there are many methods of preservation, here are a few to learn to help store food without energy usage.
How to cure and dry food
One of the oldest methods of preservation, curing can be done with any various food preservation and flavoring processes of foods such as meat, fish and vegetables, by the addition of combinations of salt, nitrates, or sugar, with the intention of drawing out most of the moisture from the food by the process of osmosis. In addition to salting, many curing processes also involve smoking, spicing, or cooking the food, particularly meats or fish.
Drying foods reduces the water in foods, thereby creating an inhospitable environment for the microbe growth that causes food spoilage.
Using a cellar
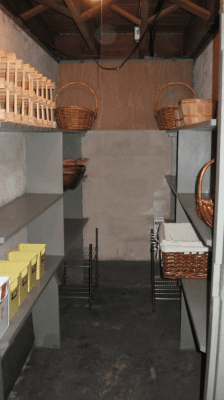
Some foods can be stored simply in a pantry or cellar. If you are fortunate enough to have a cool, dark, dry space, you can store root vegetables such as carrots and parsnips as well as hard-skinned squash.
To properly store carrots they should be stored, in layers of parchment paper and packed with damp (not wet) sand. Hard skinned squashes should be cured outside in the sun for a few days before storing. Once brought inside they should be cleaned with a solution of water with a few drops of tea tree essential oil mixed in. The squashes are wiped with this solution that removes fungus spores that can cause early spoilage.
How to use fermentation
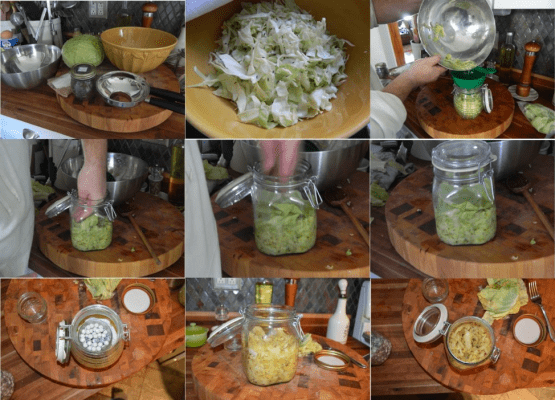
Fermentation is one of the oldest methods of food transformation and preservation in the world. It is the process of converting or cooking food through the process of bacteria converting acids and other compounds to sugars. One of the most recognized products of fermentation is sauerkraut.
This cabbage product is tangy, sour and delicious. It also can help aid your digestive tract and gut by introducing beneficially bacteria and flora to your system.
Homemade sauerkraut is absolutely nothing like its store-bought counterpart, which is usually made and preserved with vinegar and is relatively void of complex flavor and certainly void of crunchy texture.
The recipe I use was adapted from Farmhouse Culture. The ingredients are:
- 1 head green cabbage (3 pounds), shredded (14 cups), 3 whole small leaves reserved
- 1 tablespoon caraway seeds
- 1 tablespoon mustard seeds
- Coarse sea salt
The directions to make sauerktraut are:
- Combine cabbage, caraway seeds, mustard seeds and 1 tablespoon salt in a large bowl. Let stand for 20 minutes. Massage to release liquid from cabbage (forming a brine), about 5 minutes; you can also use the end of a French rolling pin to macerate the mixture.
- Pack cabbage mixture into 3 pint-size canning jars, making sure brine covers cabbage by at least 1 inch and leaving 1 to 2 inches of space at the top. Fold and push 1 reserved leaf into each, filling the top space (leaves do not need to be fully submerged). We also added a smaller jelly jar filled with pie weights to keep the cabbage as submerged as possible.
- Close jars tightly, and transfer to a glass baking dish or a nonreactive container with 2-inch-high sides. Let stand in a cool, dark place (64 degrees to 70 degrees) for 5 days.
- Slowly open and quickly close jars to gently release built-up pressure, being careful not to let the liquid bubble out. Let stand for 5 more days. Reopen jars to release pressure.
- Let stand for 5 more days. Taste to determine if kraut is sour enough. Let stand until kraut is to your liking (we like a 21-day ferment), continuing to open jars every few days to release pressure.
Homesteading Skill 3: Make your own bread and cheese
Other skills that should be in everyone’s repertoire is to know how to make your own bread, and cheese. These food staples are simple to make and are vastly more wholesome than anything you can buy in a store.
Bread is an essential part of life and an integral part of culture. Without it, many would not live, because of it, many have perished. Rulers have literally been overthrown over access to bread. In 1788 and 1789, speculation in the movement, storage, and sale of grains, combined with adverse weather conditions led to a severe bread shortage throughout France. Prices for this staple increased beyond affordability, especially for the poor and peasant classes. While the rich had plenty of fine bread made from pure white flour, the poor either starved or subsisted on an inferior product made from poorly milled bran grains.
Mass starvation eventually provoked revolution. The storming of the Bastille was more a call for bread than it was an uprising to free enemies of the crown. The people cried out for bread and searched the bakeries to no avail. There was no bread.
Today, and for now, thankfully, most of us have affordable access to the staples to make bread and what you can make in your own kitchen, even with the simplest recipe and the most humble ingredients will be far superior to anything you can buy in a plastic bag at the supermarket.
I prefer an informal style of bread making. This style is not your typical sourdough baguette or manufactured baguette, but the traditional bakery “flute” you get in most boulangeries in France; the bread of the everyday French person.
The bread is versatile; it can be toasted for jams and butters, cut into cubes for stuffing and croutons, broiled with vegetables, meats, and cheeses to produce the delicious tartines (open faced sandwiches) that are so popular in cafes today.
I also like this bread because it doesn’t involve a lot of pre-work. There is no starter to make and keep alive, there is no extra time proofing yeast. This recipe produces two large loaves. You can also freeze the loaves after molding into the bâtard.
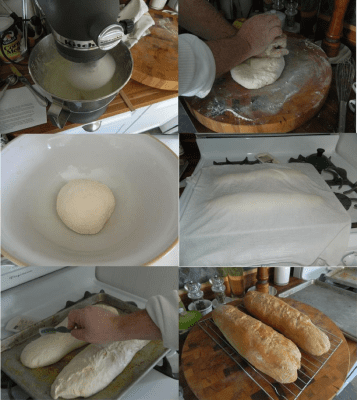
How to make traditional French bread
Ingredients for traditional French bread are:
- 5 1/2 to 6 cups of all-purpose flour
- 2 1/2 teaspoons active dry yeast
- 1 1/2 teaspoons salt
- 2 cups warm water (110 degrees F)
- cornmeal
- 1 egg white
- 1 tablespoon water
The recipe for French bread:
- In a large mixing bowl, combine 2 cups flour, yeast, and salt. Add 2 cups warm water, and beat with an electric mixer fitted with a dough hook on low to medium speed for 30 seconds. Beat on high speed for 3 minutes. Turn the mixer to low and add the remaining flour (cup by cup) until incorporated.
- On a lightly floured surface, knead in enough flour to make a stiff dough that is smooth and elastic. Knead for about 8 to 10 minutes total. Shape into a ball. Place dough in a greased bowl, and turn once. Cover, and let rise in a warm place until doubled.
- Punch dough down, and divide in half. Turn out onto a lightly floured surface. Cover, and let rest for 10 minutes. Roll each half into a 15 x 10 inch rectangle. Roll up, starting from a long side. Moisten edge with water and seal. Taper ends.
- Lightly grease a large baking sheet. Sprinkle with cornmeal. Place loaves, seam side down, on the prepared baking sheet. Lightly beat the egg white with 1 tablespoon of water, and brush on. Cover with a damp cloth. Preheat the oven to 375 degrees F. Let rise until nearly doubled, 35 to 40 minutes.
- With a very sharp knife, make 3 or 4 diagonal cuts about 1/4 inch deep across top of each loaf. Bake for 20 minutes. Brush again with egg white mixture. Bake for an additional 15 to 20 minutes, or until bread tests done. If necessary, cover loosely with foil to prevent over-browning. Remove from baking sheet, and cool on a wire rack.
How to make your own cheese
We have been experimenting with different aspects of home economics in order to make our house an engine of production rather than a house of simple consumption; this means learning new homesteading skills.
While I plan to learn more cheese making techniques, I thought it best to start with the easiest, queso fresco or queso blanco. This is a semi-soft cheese that melts slowly and can be fried or used in Mexican dishes when a bright, slightly salty cheese is called for.
The technique is quite simple: warm the milk, sour the milk by way of an acid to separate the curd from the whey, strain the whey, season and cure the final cheese.
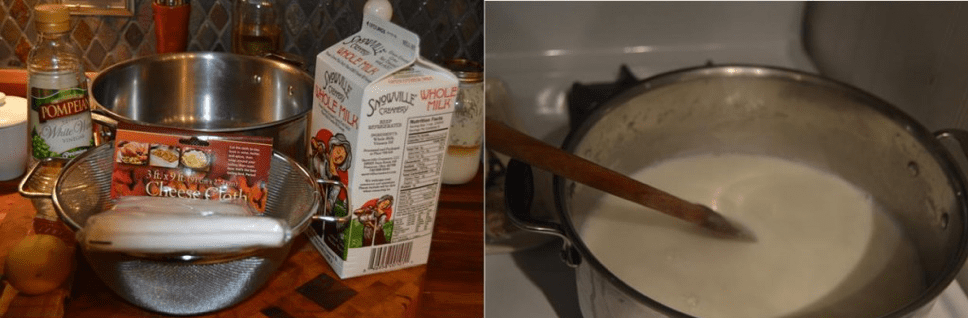
For this recipe, you will need ½ gallon of high quality, not ultra-pasteurized milk. I like to use Snowville Creamery milk because it is close to organic and is barely pasturized…it is about as close to raw milk, you can get commercially.
¼ cup of an acid. This can take the form of lemon juice or vinegar. This markes the difference between queso fresco and queso blanco. Fresco uses lemon juice and blanco uses vinegar.
Thermometer (Candy or immersion). You need to heat the milk to temperature 165°F to 185°F so it is important to be accurate.
Strainer and cheese cloth. This will allow you to strain the whey from the curds as well as cure the curds.
Seasoning of choice: salt, pepper, parsley, garlic and other herbs. Depending on what you are going to use the cheese for, select appropriate seasoning as the basic recipe yields a neutral flavor.
Warm the milk in a heavy bottomed pan, using the thermometer to monitor the temperature as it rises. Once the milk reaches the appropriate temperature range, 165°F to 185°F, remove it from the heat and add your acid of choice. Allow the mixture to sit for a few minutes after stirring in the acid for the protein and fat globules in the milk to separate from the liquid portion of your mixture.
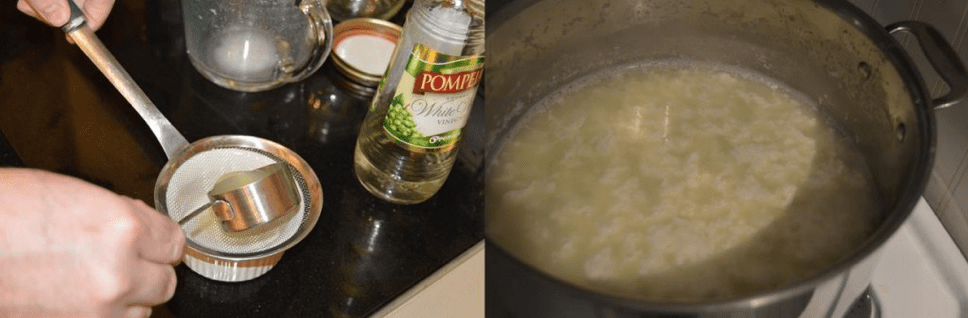
Spread cheesecloth over a strainer or colander, pour the mixture over the strainer to separate the curds from the whey. Collect the whey in a bowl (this can be used to soak beans, marinate meats, etc. adding and amazing flavor and tenderness unmatched with other methods). The curd can then be salted, seasoned and formed into a ball in the cheesecloth and left to rest in the refrigerator for at least 4 hours.

I like to use this cheese instead of goat cheese on a salad after it is fried in panko bread crumbs.
Making your own cheese is empowering. Understanding the science behind the product is also important so you can apply it to other, more complicated recipes.
Homesteading Skill 4: Learn to sew, hand sew and mend
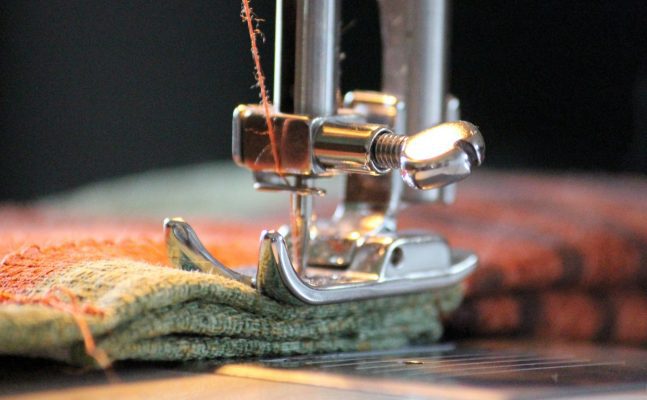
A couple of yards of fabric is significantly less expensive than a new shirt from a department, or even a discount store. Knowing the basics of sewing with a machine or by hand is the essence of thrift.
It doesn’t have to be expensive to get a sewing machine. I was fortunate enough to have one early in life as a graduation gift from my mother. 20 plus years later, the machine was broken beyond repair, but fortunately, I had enough reward points with my bank to get a Sears gift card and purchased a new machine with it. There are other options, such as thrift stores and consignment shops to get a hopefully gently used machine and get sewing!
Most fabric and craft stores offer classes on machine sewing for every skill level, so if you are a beginner, it would be in your best interest to sign up for one. Or a more thrifty option would be to canvas your friends and family who sew if they would give you some pointers or lessons in exchange for homegrown produce or a craft item that you make.
How to sew by hand
So many items of clothing or household linens get discarded because of a loose hem or small hole, it is such a waste of resources and money. Learning to hand sew in order to mend items that either you sewed or purchased can keep treasured clothing or heirloom linens rather than throwing them away.
Here are a few stitches that are used in creation and mending. Try practicing on a spare piece of fabric until you have reached a good level of proficiency.
Running Stitch
The most basic stitch is called a running stitch. It’s used for gathering, mending, and tucking. Depending on its use, you can either knot your thread or take a couple of back stitches to lock it into place. This is also known as a basting stitch when the spans between needle points are longer (1/4-1/2 inch). Pull your needle through the fabric from the backside (wrong side). Once the knot hits the fabric, make a stitch to the left or right. Bring the thread back up and repeat.
Backstitch
This stitch is what was used before sewing machines to make clothing. You should always work from left to right when using this stitch. Take a small stitch, then insert the needle at the end of the previous stitch, bringing it out beyond the point where the thread emerges. Continue, always inserting the needle in the end of the previous stitch, this locks the stitches together.
Blanket Stitch (Buttonhole Stitch)
When making clothing or linens such as duvet covers, you will need to learn to make buttonholes. If you are making these items by hand, you need to learn the blanket or buttonhole stitch.
To begin, you secure the thread on the wrong side of the fabric near the hole, then with the right side facing upward, insert the needle from back to front through the fabric 1/8 inch from the edge of the buttonhole. Next, wrap the working head around behind the eye end of the needle, then behind the needle point. Pull the needle through, bringing the knot to the fabric edge. Then you continue making closely spaced stitches and knots around the hole to secure the fabric.
Homesteading Skill 5: How to keep chickens
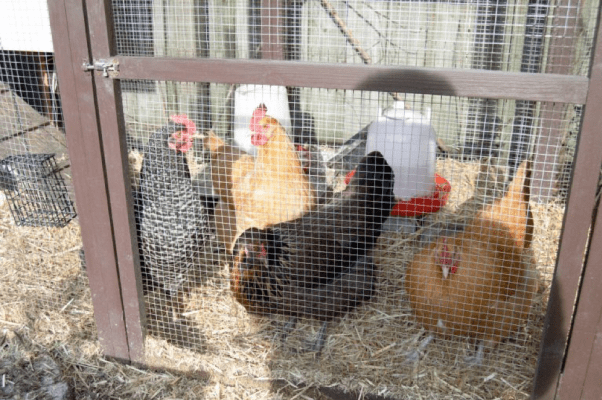
Keeping chickens is one of the best old time homesteading skills. These docile creatures have transformed my home and my business garden. They provide the freshest, finest eggs imaginable (they have a very gourmet and very organic diet), they provide amazing compost accelerant with their spent bedding and they are fun and entertaining to have on my plot of land.
I recommend reading about and learning which breeds are good for your weather (summer and winter) as well as the kind and color of eggs you want (there is a whole rainbow). In addition, you will need to check the regulations in your local area on the number of chickens that can be kept, where the coop must be positioned and how to deal with litter.
You also need to provide them with shelter (indoor and outdoor) from weather and predators. I suggest researching coops to buy or if you are handy you can build your own from scratch! Each chicken needs 4 square feet of indoor/outdoor space. I don’t follow those rules. In my home garden, I had a coop for 12 chickens, but only put 4 chickens in it. The same goes for my market garden where I purchased a coop designed for 18 chickens and only have 9 in it.
Their diet should be a balanced, organic one. Our chickens are fed a milled organic product daily as well as a “salad” of greens and weeds from the garden, edible flowers and a mixture of fresh (seasonal) or dried herbs. Our combination includes a variety of herbs that includes garlic and oregano for respiratory health.
Chickens must have a ready supply of fresh, clean water. Their bodies utilize a lot of water in the production of eggs and it must be replenished throughout the day.
Chicken keeping is a rewarding skill and will keep you in fresh eggs daily. You can also try your hand at quail farming as well, which, while they are much smaller, have a quicker growth period, produce lots of eggs, and don’t need anywhere near as much space as chickens.
Over to you to start homesteading
Reviving these old time homesteading skills will save money over time and also increase your own sense of self-reliance.
By growing, making and crafting your own food, clothing, and household linens, you also control the quality of the end product by knowing what has gone into creating it.
If you have any favorite homesteading skills that you think are just as important, let me know in the comment section below.
Good article, but there are a couple of things that need attention:
1. Good French bread requires a ‘wet’ oven with plenty of steam. I put a large cast iron skillet in the bottom of the oven and when everything is hot I put in the bread and throw a cup of hot water into the skillet. Be careful that yo don’t get a flash steam burn when doing this.
2. You may find that your curd doesn’t develop fully until the milk is heated to 195F