Sighting a rifle – crucial for accuracy
Seasoned riflemen tend to say that a rifle is no better than its sights. Sighting a rifle scope is one of the most important things to ‘get right‘ to make sure you land your hits where you want them.
There is no arguing that a scope-mounted rifle brings an entirely different level of accuracy in comparison to open or iron sights. But you can’t just pop a scope on and begin shooting. Before gaining that accuracy improvement, rifle hunters and recreational shooters need to deal with sighting in or zeroing a riflescope.
Regardless of whether you get a new rifle, riflescope, or change ammunition brands, bullets, or anything else, you will need to sight in your firearm. Even the manufacturer’s different batch series of the same ammo type and the weight requires a weapon to be zeroed in.
Whether you are a seasoned hunter, target shooter, air rifle shooter, or a prepper, we will try to answer the question of how to sight a riflescope in just 8 steps so that you can remember how to do it, next time you need to zero in your rifle sights.
Why do you need to sight a rifle scope?
It is hard to imagine an ethical and responsible hunter without an adequately sighted rifle. A hunter’s goal is to have well-placed shots that provide a quick and ethical kill.
So of course, it is completely necessary to sight a rifle. That sighting-in process implies aligning the riflescope’s reticles with the bore of a rifle.
In other words, this adjustment will help you to determine where the shot will strike at a known distance.
At this point, it should be noted that sighting-in has nothing to do with your shooting ability and accuracy. Those are largely determined by your marksmanship skills. No matter what level you are at as a shooter, sighting in is just making shooting groups as small as possible. The whole process is all about the rifle and carried out from a stable platform, which we will look at later in this post.
8 Easy steps to sight a rifle scope
To sight, a riflescope correctly can be an intimidating and frustrating process for inexperienced gun owners, but we will try to explain our sighting process in a simple method that you can follow to make this task easy and successful.
1. Have a stable platform to sight your riflescope on
Before any activity, you should obtain the appropriate sighting toolkit which includes gun vice, small screwdrivers, Torx wrenches, or Allen keys for installing and adjusting your scope.
![]()
Since the stable platform for the rifle is mandatory, you will need one or more sandbags or some kind of commercial rifle rest which is undoubtedly better than sandbags. Specially made site-rests can be very cheap to pick up and are great to use as you know that you are sighting on an even, level, and stable platform. If you don’t have a place to secure your rifle for the sighting process, I’d recommend using an MTM Site-In-Clean Rest as it has rear stock support so that you can keep the rifle in position and still move around it to make your adjustments.
2. Mount the scope onto the rifle
As the first and fundamental part of sighting a scope for shooters, scope mounting can be a tricky process. It is essential to make sure that the firearm is unloaded and the chambers are clear. That way, it is safe to work with. If you are purchasing customized rings, check the installation manual that comes with it for proper installation.
Assuming that you have checked the compatibility of your scope with a type and size of mounting rings and bases, as well as with pre-drilled holes or grooves on your rifle, scope mounting is carried out using a gun vice that can help follow the steps.
After you have firmly mounted the bottom half of the rings, place the riflescope and then put the top rings on top of the scope. The top halves of the rings you should tighten only enough to allow the scope to rotate and move back and forth.
Now, shoulder the rifle and raise the scope to the eye to check if there’s enough eye relief. After you ensure your eye is safe from recoil, you need to tighten the screws in a criss-cross, alternating pattern. This is important to do unless you want to end up with a black eye.
3. Boresighting
The next thing you must do is get the rifle on paper using the boresight technique. Bore sighting is a preliminary procedure and usually takes place within a close range of somewhere between 25 to 50 yards using a large paper target.
While the bolt action and single-shot guns can be bore-sighted in an old-fashioned way by looking through the barrel, semiautomatics, pumps, and lever-action rifles can be sighted only with the help of a device called laser bore sighter.![]()
The bore sighter can be inserted in the muzzle, or the chamber of your rifle, and its role is used to line up the barrel with your optics. Make sure you get a bore sighter that is suitable to the type of weapon you are using, as they range in size. One bore sighter that I use often is the SiteLite Ultra (pictured below), which fits all calibers from .22 to .50 as well as 20 and 12 gauge shotguns.
Whether you are using the old method or a newer method. with a gun mounted in a secure rest or on sandbags, you will, by adjusting the dials on the scope for elevation and the windage, bring the crosshairs to the same point on the target as you see through your barrel.
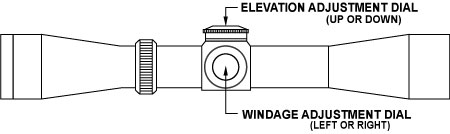
More precisely, you have to ensure the riflescope reticle is centered where the gun is pointing.
4. Test and adjust with live ammunition
Assuming that the scope has been adjusted close enough to hit somewhere on paper, we will move up a target to the 100-yard distance. In this part of the process, we will try to confirm rifle’s capabilities with live ammunition firing the bullets in three-round sets.
It is imperative to shoot from a comfortable and stable position to remove as much human error as possible. These first 3 shots you will fire slowly and very carefully, with intervals between shots until your rifle barrel has cooled to ambient temperature.
For this shooting, you should set your variable power scope to the highest magnification that delivers a sharp, clear image.
5. Check the target to see where your adjustments should be made
After you fire the first group, you will need a little mathematics to work out what changes you need to make. When you check the target to see where you’re hitting, you should analyze it to find out the needed adjustments.
Your shots might not have hit the center, so you should measure in inches how far off your group (Point of Impact) POI was from the center and adjust your scope until the crosshairs of the reticle are right in the center of the three-shot group. In the image below, you can see how the adjustments work to bring your tight grouping to the center of the target.
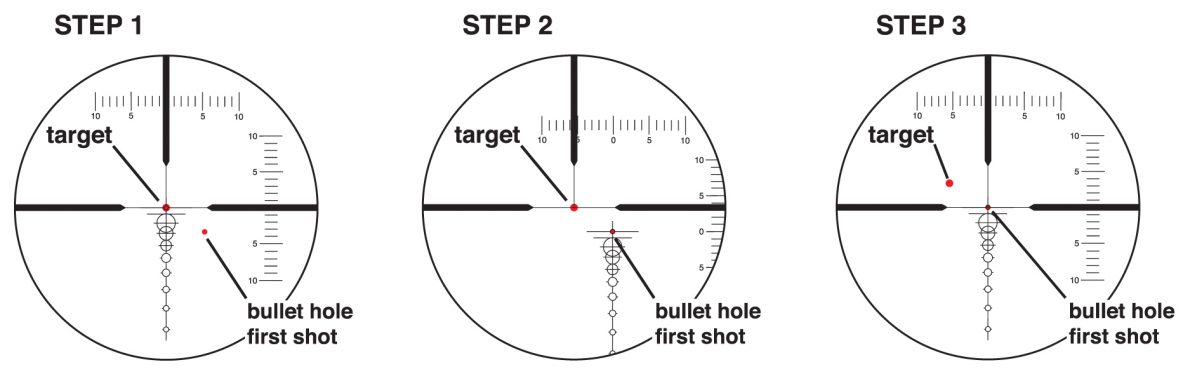
Since you have taken both the vertical and horizontal distance of the center into account, you will recalculate inches in MOA (Minute of Angle – as seen below) and convert it into the appropriate amount of clicks with turrets on your riflescope.
The MOA is simply a unit of measurement for an angle, except it uses time as a measurement. One MOA is equal to one inch per 100 yards. The best way to work out your MOA is to measure your grouping. If you are shooting at a target that is 50 yards away, and you have shot 3 inches to the left of that target, then remembering that 1 MOA is 1 inch per 100 yards, your MOA (taking a look at the diagram below) is 6 MOA.
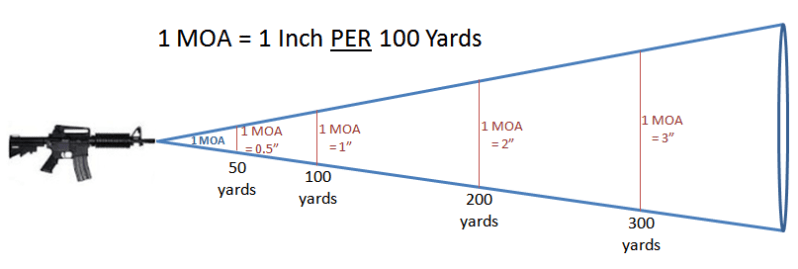
Note: Most retail riflescopes will have scope adjustments in increments of MOA with the most common amount for each click which is expressed in ¼-inch at a distance of 100 yards. The MOA is usually presented roughly as 1 inch at 100 yards meaning that 1 click will move the bullet impact 1/4″ at 100 yards. For example, adjusting the scope for windage or elevation for 1 inch would take 4 clicks of rotation.
However, if you are following a trend toward scopes of higher power and hunting with longer distances than 250-300 yards, you will need some of the scopes for 500 yards. Besides very precise windage and elevation knobs, they must also have some sort of external adjustment feature like a side focus to compensate for parallax error.
6. Test again after making adjustments
It is always a good idea to go several clicks past the required number and then go back. It is particularly recommended when making significant adjustments or when using low-quality scopes. Another trick is to adjust the scope in only one direction at a time. In this step when you make adjustments, the quality riflescope with precise and audible clicks justifies its higher price.
Having the adjustments been done, you can now fire another three-round string with applying the proper trigger and breathing control to check if the bullets hit where you’re aiming.
7. Fine-tuning for the perfect group size
If you haven’t got a perfect grouping, you have to make some fine-tuning and repeat the process until you’re close enough. Of course, you will re-shoot any flyers to have 3 good shots on the target.
As a universal rule, the rifles chambered in most of the modern rifle calibers should be sighted to put the point of impact (POI) about 2.5 inches above the point of aim at 100 yards. That will meet the needs of the most typical hunting distances and scenarios.
8. Clean the barrel, let it cool and conduct the last shoot
After you made the final adjustments, it is recommended to clean the barrel, leave it cold, and fire one last group to confirm it. However, the experienced shooters will check a zero before the competition or hunting season. A good riflescope will hold a zero for a long time as long as you don’t drop or damage it.
Over to you
Although the sighting in your riflescope can be time-consuming and frustrating, to make sure you do it right the first time, you should have patience while following the rifle sighting techniques listed above.
On average, you will probably end up using a box of 20 cartridges to sight-in your rifle. However, this may depend on how quickly you can adjust your sights in the first test and adjust step.
In the end, I hope you found this short guide on how to sight a rifle with a riflescope useful and informative.