Whether you’re planning your next great outdoor adventure or just want to be prepared for any situation, building a DIY outdoor survival kit is a smart move. It’s not just about safety; it’s about creating a customized set of tools and supplies tailored to your needs and the environment you’ll be exploring.
To build a DIY outdoor survival kit, start by gathering essential tools, medical supplies, and sustenance items tailored to your environment and personal needs.
Curious about which items are must-haves for your kit, or how to pack efficiently for any scenario? Keep reading to uncover detailed guides on selecting, customizing, and maintaining your survival kit, ensuring you’re prepared for anything the wild throws your way.
Tools and Techniques for DIY Survival Gear
Creating your own survival gear is not only a budget-friendly approach but also allows you to tailor each item to your specific needs. From fuel-based gear to first aid and hygiene solutions, mastering these skills can significantly enhance your preparedness. Let’s dive into how you can create essential survival items with tools and techniques available at home.
Fuel-Based Gear
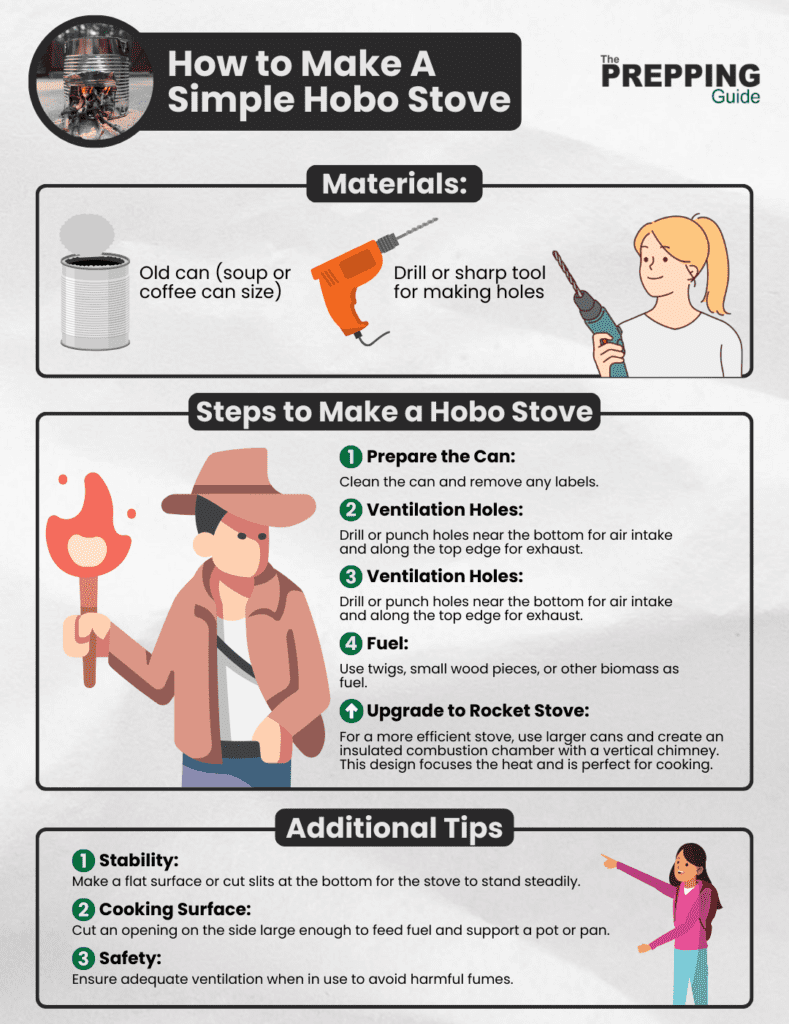
Building your own fuel-based gear, such as stoves and wind screens, can be both rewarding and practical. Start with a simple hobo stove made from an old can, which is perfect for cooking and warmth. Drill holes for ventilation and use twigs or small pieces of wood as fuel. For a more efficient cooking experience, consider making a rocket stove using larger cans. This stove design is highly efficient, using less fuel and providing a more concentrated heat source, ideal for boiling water or cooking meals.
Wind screens are crucial for maintaining the efficiency of your stove, especially in challenging weather. You can create a windscreen with aluminum foil or cut out from a disposable aluminum tray. Shape it to fit around your stove, leaving ample space for air circulation. This simple addition can significantly reduce cooking time and fuel consumption, making your DIY gear more effective in outdoor settings.
First Aid and Hygiene
Ensuring you have basic first aid and hygiene solutions in your kit is essential for outdoor survival. You can create homemade hand sanitizer using isopropyl alcohol, aloe vera gel, and essential oils for a soothing and effective disinfectant. This blend not only keeps your hands clean but also prevents the spread of bacteria and viruses in the wilderness.
For respiratory protection, consider making a DIY HEPA filter mask. Use HEPA vacuum bags or air filters as the filtering material, and sew them into fabric masks. These homemade masks can provide significant protection from dust, pollen, and possibly even viruses, crucial for your health in diverse environments. According to NASA, HEPA filters capture “virtually 100% of particulates.” Additionally, learning to make butterfly bandages from adhesive tape and gauze can be a lifesaver for treating cuts and preventing infections.

Water and Food
Ensuring you have access to clean drinking water is paramount in any survival situation. A homemade water filter can be a lifesaver when you’re far from a clean water source. To make one, fill a bottle with alternating layers of charcoal, sand, and gravel. The charcoal helps to remove bacteria and some chemicals, while the sand and gravel filter out larger particles. However, filtering water is just the first step; boiling your filtered water is essential to kill any remaining microorganisms and ensure the water is safe for drinking. This two-step process—filtering followed by boiling—provides a reliable method for obtaining drinkable water in the wilderness.
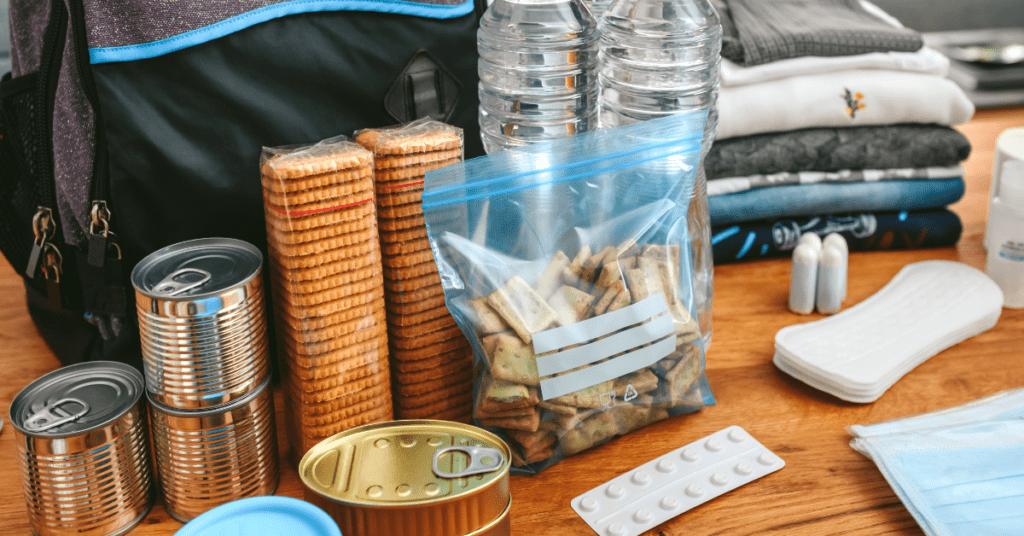
When it comes to nourishment, selecting the right foods for your survival kit is crucial. High-calorie, lightweight, and non-perishable items are ideal. Homemade trail mix, with a blend of nuts, seeds, and dried fruits, offers a perfect balance of fats, proteins, and sugars, delivering a quick energy boost without taking up much space or adding excess weight. Similarly, jerky is an excellent source of protein, and dehydrating your own fruits and vegetables allows you to bring along a variety of nutrient-rich foods that won’t spoil. These homemade snacks are not only cost-effective but also customizable, letting you tailor your food supply to your dietary preferences and nutritional needs.
Building Your Kit: Step-by-Step Guide
Now that you’ve learned to create essential survival gear, it’s time to build your kit. Selecting the right container, crafting additional tools, and assembling a first aid kit are crucial steps. This guide will help you compile everything you need into a compact, efficient survival kit.
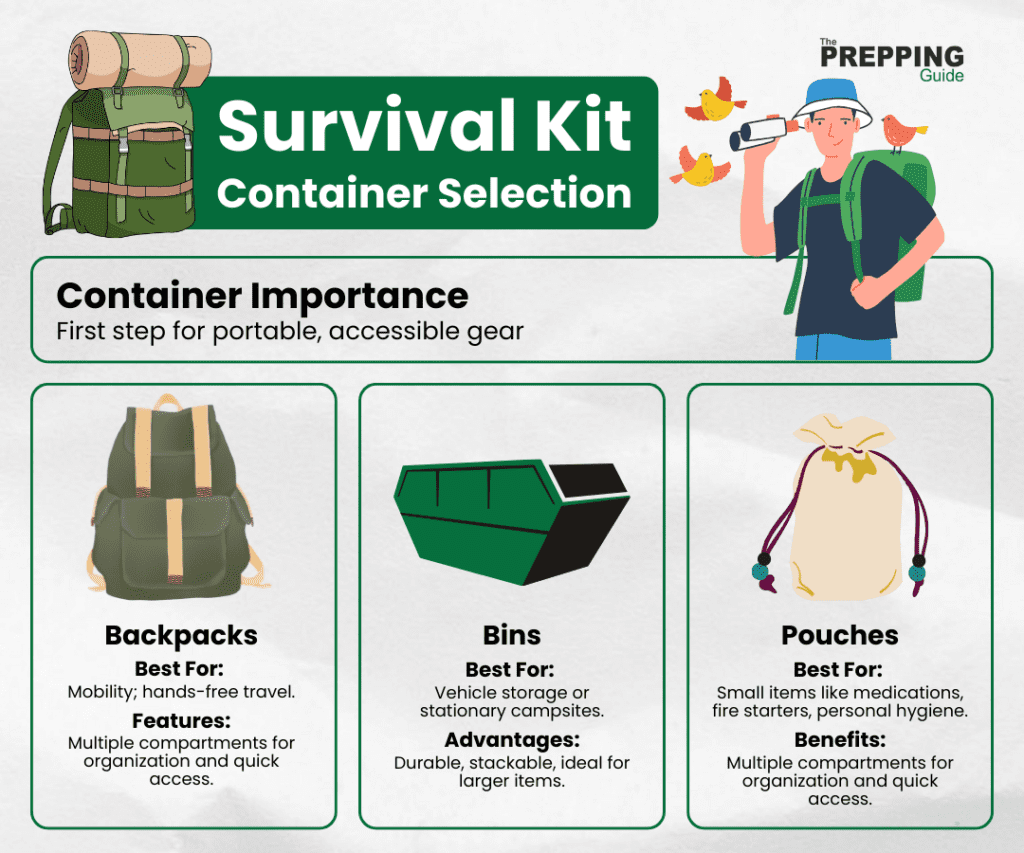
Selecting the right container for your survival kit is the first step in ensuring your gear is portable and accessible. Backpacks are ideal for situations where mobility is key, allowing you to keep your hands free while carrying your essentials. Look for a backpack with multiple compartments for easy organization and quick access to your items.
Bins and pouches can be useful for organizing supplies within your vehicle or for stationary campsites. Bins offer a durable solution for storing larger items and can be easily stacked or tucked away. Pouches, on the other hand, are great for segregating smaller items like medications, fire starters, or personal hygiene products, ensuring they are easy to find when needed.

With your container ready, focus on crafting tools that can serve multiple purposes. Start with basic tools like a multi-tool or Swiss Army knife, which are indispensable for tasks like cutting, sawing, and screwing. You can also make your own fishing gear with line, hooks, and sinkers, ensuring you can procure food in the wild.
For more advanced survival gadgets, consider assembling a solar charger for electronic devices or a DIY water filtration system using available materials. These tools not only enhance your survival capabilities but also bring a sense of self-sufficiency and preparedness for any situation.
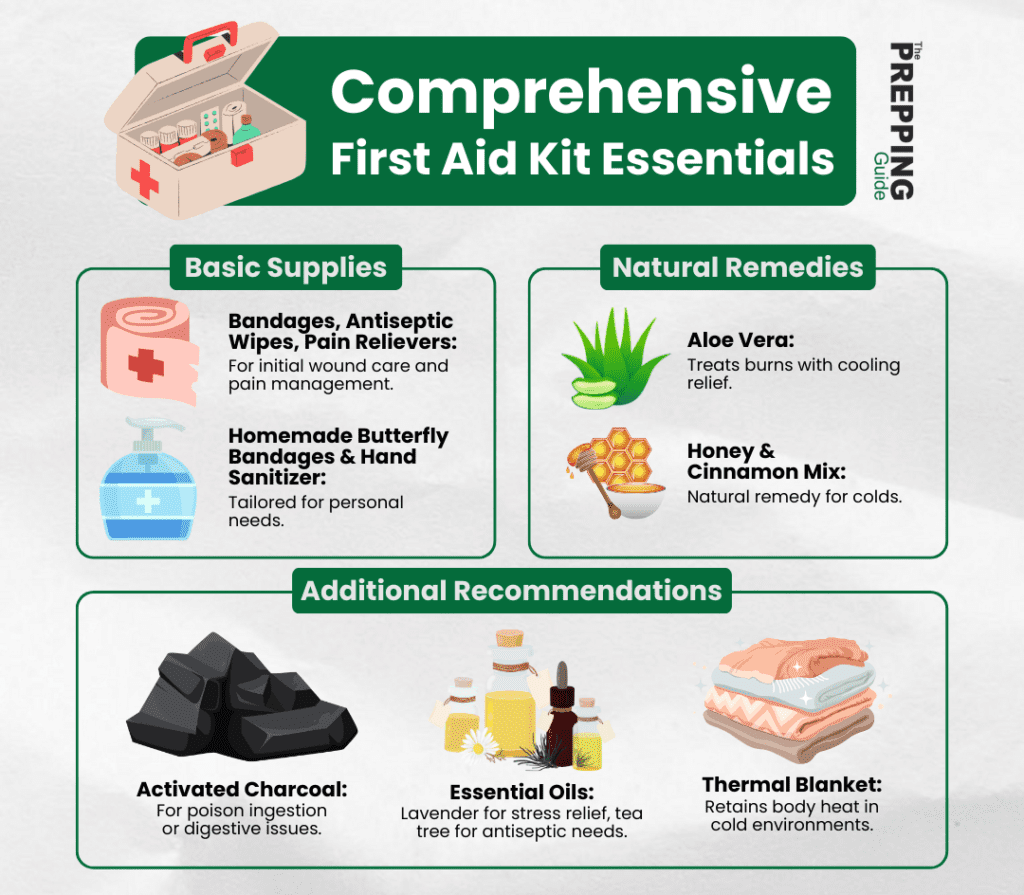
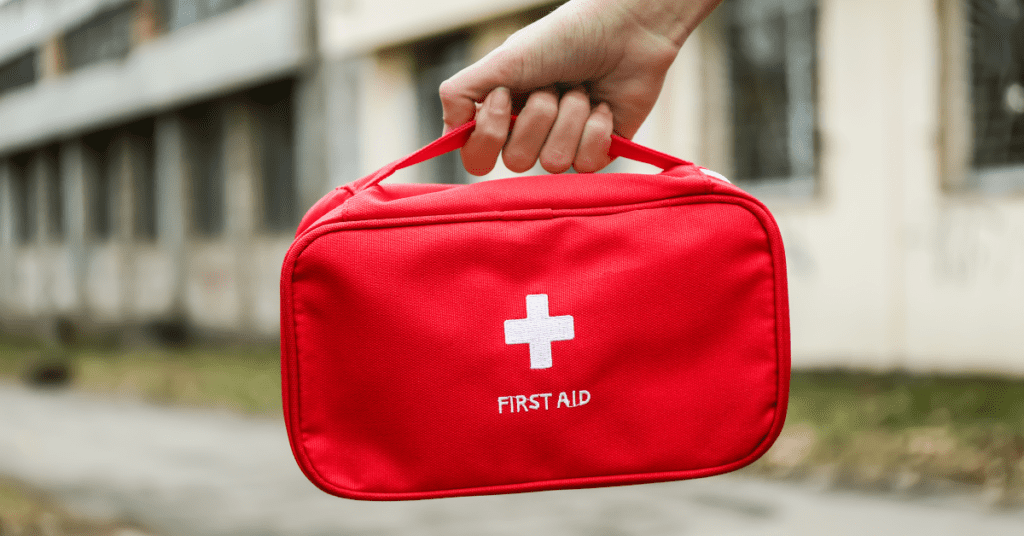
Your first aid kit is a critical component of your survival gear. Start by including basic supplies such as bandages, antiseptic wipes, and pain relievers. Don’t forget to add your homemade butterfly bandages and hand sanitizer, tailored to your needs.
In addition to store-bought items, consider adding natural remedies that you can prepare at home, such as aloe vera for burns or a mixture of honey and cinnamon for colds. These homemade remedies can be effective, natural alternatives to traditional medicines, ensuring you’re prepared for a range of health issues in the wilderness.
Customizing Your Survival Kit
After assembling the basics of your survival kit, the next step is customization. This involves tailoring your kit to the specific environment you’ll be in and preparing for potential emergency scenarios you might face. By personalizing your kit, you ensure that you’re as prepared as possible for anything that comes your way.
Personalizing Your Kit for Environment and Emergency Scenarios
Consider the environment you’ll be exploring or potentially getting stranded in. Whether it’s the dense forest, arid desert, or the cold mountains, each setting requires specific tools and supplies. For instance, in a forest, a machete or a saw could be indispensable for clearing paths or making shelter, while in the desert, extra water storage and sun protection gear are crucial.
Think about the common emergencies that occur in these settings and prepare accordingly. For snowy mountain terrains, include items like thermal blankets and hand warmers to prevent hypothermia. In contrast, for desert environments, focus on sun hats, sunscreen, and perhaps a portable shade structure. This foresight can make all the difference in surviving unexpected situations.
Adding Personal Needs to Your Kit
Your survival kit should also cater to your personal needs, including any medical conditions you may have. Make sure to pack a sufficient supply of any prescription medications, labeled and stored in waterproof containers. Additionally, consider including items like glucose gels for diabetics or epinephrine injectors for those with severe allergies.
Don’t forget about communication tools. A solar-powered or hand-crank radio can be a lifeline for receiving weather updates and emergency broadcasts. A whistle and mirror can be used for signaling help, and a fully charged power bank, along with a durable, waterproof phone case, can keep your mobile phone operational for emergency calls or GPS navigation when you’re off the grid.
Packing and Maintenance Tips
With your survival kit customized to your needs and environment, it’s important to pack it efficiently and maintain its readiness. Proper packing ensures that your gear is easy to carry and access, while regular maintenance keeps everything in working order.
Smart Packing Tips for an Efficient and Lightweight Survival Kit
Start by grouping items based on their use. For instance, keep all fire-starting tools together in one waterproof pouch and first aid items in another. This organization makes it easier to find what you need quickly without rummaging through your entire kit.
Use space-saving techniques like rolling clothes instead of folding and utilizing every nook and cranny. For example, stuff socks and other small items inside pots or shoes. Lightweight, compact items are preferable, but don’t compromise on the quality or durability of essential tools. Balancing weight with necessity is key to a kit that’s both portable and practical.
Keeping Your Survival Kit in Top Condition: Maintenance and Updates
Regularly check and maintain your survival kit to ensure everything is in working order. Replace expired items such as medications and batteries, and test gear like flashlights and stoves to make sure they function properly. It’s a good practice to review the contents of your kit every six months and after every use to replenish used supplies and make any necessary updates based on your experiences or changes in your personal needs.
Also, consider the shelf life of food items and rotate them out as needed to keep your nutrition options fresh and safe to consume. Staying proactive about your kit’s maintenance means you’re always ready for the next adventure or unexpected emergency.
Final Thoughts
Building and maintaining a DIY outdoor survival kit is a proactive step towards ensuring your safety and well-being in the wild. By carefully selecting, customizing, and maintaining your gear, you’re not just preparing for the worst—you’re equipping yourself with the confidence to face whatever challenges come your way. Remember, the best survival tool is knowledge and preparation. Stay safe, and enjoy your adventures with the peace of mind that comes from being well-prepared.