Whether you’re a prepper gearing up for unforeseen circumstances or just curious about military gear maintenance, knowing the best way to clean a military gas mask is crucial. This knowledge not only ensures your safety but also extends the life of this essential equipment.
The best way to clean a military gas mask involves a series of meticulous steps: disassembling, cleaning each component with suitable materials, thoroughly inspecting for damages, and proper reassembly. These steps ensure that the mask remains effective in protecting you from harmful contaminants and prolongs its usability.
Diving deeper into this article, you’ll discover detailed guidelines and practical tips for each step of the cleaning process. From selecting the right cleaning supplies to understanding the nuances of reassembly and troubleshooting common issues, we cover everything you need to know. So, keep reading to learn what is the best way to clean a military gas mask, ensuring it’s always ready to provide maximum protection.
Things To Observe Before Cleaning Military Gas Masks
Cleaning a military gas mask is a task that requires careful preparation and adherence to safety standards. Before diving into the specifics, it’s important to understand the necessary precautions and preparations to ensure a safe and effective cleaning process.
Essential Safety Precautions for Gas Mask Cleaning
When cleaning a military gas mask, safety should always be your top priority. Adhering to these precautions not only ensures your safety but also maintains the integrity of the gas mask. Here are some key safety measures to follow:
- Read the Manufacturer’s Instructions: Always start by reading the manufacturer’s guidelines. Different gas masks may have specific requirements or limitations for cleaning.
- Work in a Well-Ventilated Area: Ensure your cleaning space is well-ventilated. This minimizes the inhalation of fumes from cleaning agents which can be harmful.
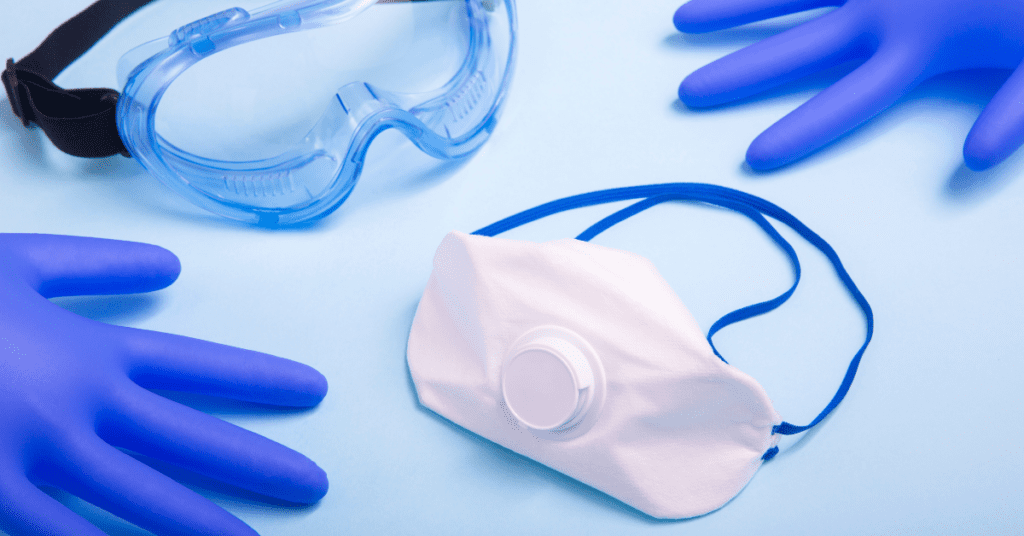
- Wear Gloves and Safety Goggles: Protect your hands with gloves and your eyes with safety goggles. This prevents skin and eye irritation from cleaning chemicals.
- Avoid Eating or Drinking Near the Cleaning Area: To prevent accidental ingestion of harmful chemicals, do not eat or drink in the cleaning area.
- Use Appropriate Cleaning Agents: Only use cleaning agents that are recommended for use on gas masks to avoid damaging the materials.
Preparing Protective Gear and Cleaning Workspace
Before beginning the cleaning process, setting up your workspace and wearing the right protective gear is essential. Your workspace should be a stable, well-lit surface in a well-ventilated area, free from clutter to avoid accidents. Ensure the space is also free from any sources of ignition as some cleaning agents can be flammable.
In terms of protective gear, wearing gloves is crucial to protect your hands from chemicals used in cleaning agents. Safety goggles are also necessary to prevent any splashes from getting into your eyes. If you’re dealing with particularly strong chemicals, consider using a protective apron and a face mask for additional safety.
Managing Chemical and Biological Contaminants on Gas Masks
When handling military gas masks, it’s important to consider the potential presence of chemical and biological contaminants. First, identify if the mask has been exposed to such hazards. If it has, special decontamination procedures must be followed according to military guidelines.
Next is the decontamination process itself. This may involve using specific solutions designed to neutralize chemical or biological agents. It’s crucial to follow the recommended contact time for these solutions to ensure complete decontamination. After the decontamination process, the mask should be thoroughly rinsed with water to remove any residual cleaning agents.
Cleaning Supplies and Tools
The right supplies and tools are essential for effectively cleaning a military gas mask without damaging it. Let’s explore the recommended products and tools that are both safe and effective for this task.

Recommended Cleaning Products for Military Gas Masks
Choosing the right cleaning products is crucial to maintain the integrity of a military gas mask. Below is a list of recommended products, each with a specific purpose:
- Mild Soap Solution: A gentle, non-abrasive soap solution is ideal for removing dirt and grime without damaging the mask material.
- Disinfectant: Use a disinfectant that is effective against a broad spectrum of microbes but safe for the mask materials.
- Decontamination Solution: In cases where the mask has been exposed to hazardous substances, a specialized decontamination solution may be necessary.
Choosing the Right Cleaning Agents for Your Gas Mask
Selecting appropriate cleaning agents for your military gas mask is crucial for both effective cleaning and preserving the integrity of the mask. It’s important to find a balance between efficacy and safety.
The primary consideration should be the compatibility of the cleaning agent with the mask materials. Harsh chemicals can degrade rubber and plastic components, reducing the effectiveness and lifespan of the mask.
Furthermore, the effectiveness of the cleaning agents is paramount. The ideal product should not only remove contaminants like dirt, oil, and potential biological agents effectively but also ensure that no harmful residues are left behind. Always refer to the manufacturer’s recommendations and military standards when selecting cleaning agents to ensure both safety and efficiency.
Essential Tools: Brushes, Cloths, and More for Gas Mask Care
Having the right tools at your disposal is just as important as choosing the correct cleaning agents for maintaining a gas mask. Here are some essential tools that should be used:
- Soft-Bristled Brushes: Ideal for gently scrubbing away dirt and grime, especially in crevices and difficult-to-reach areas of the mask.
- Microfiber Cloths: Perfect for wiping down the mask without leaving behind any lint or causing scratches.
- Cotton Swabs: These are great for cleaning small components and tight spaces where larger brushes may not reach.
Each tool is designed for a specific purpose and should be used carefully to ensure that the mask is cleaned effectively without causing any damage.
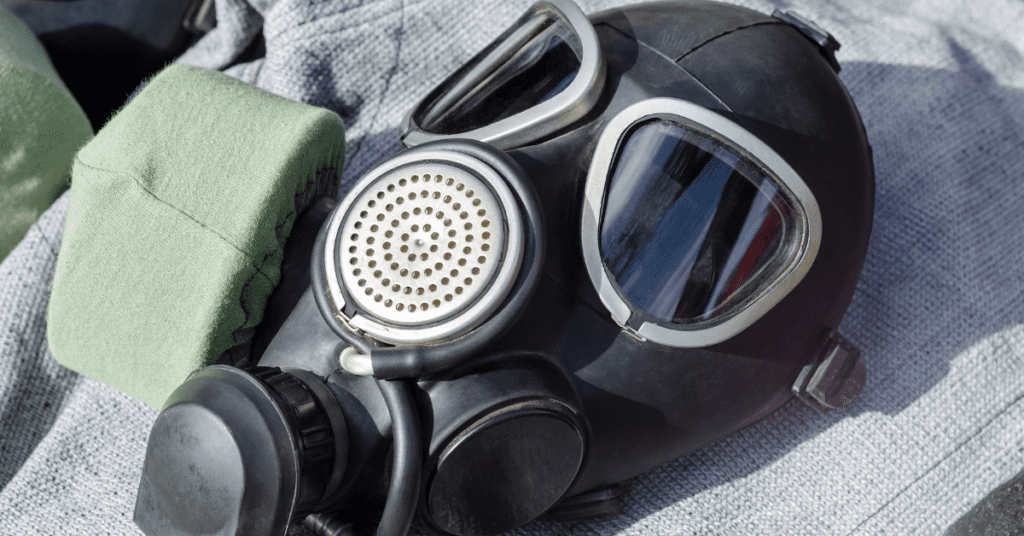
1. Disassembly and Inspection
The disassembly and inspection of a military gas mask are critical steps in its maintenance. Careful disassembly allows for thorough cleaning and inspection, ensuring the mask functions correctly and remains in good condition.
Below is a step-by-step guide for safe disassembly:
- Remove the Filters or Canisters: Carefully unscrew or detach the filters or canisters. Ensure you do this in a well-ventilated area and wear gloves to avoid contamination.
- Detach the Head Harness or Straps: Gently remove the straps or head harness, paying attention to any clips or fastenings. This will help in cleaning the straps separately and prevent damage.
- Separate the Facepiece from Other Components: If the facepiece is connected to other components like lenses or voice diaphragms, carefully detach them. Remember to keep all small parts in a safe place to avoid misplacing them.
…and a video to help you understand the process better.
Identifying and Targeting Dirt and Contamination
The first step in cleaning a military gas mask is to identify areas of dirt and contamination. Look for visible dirt, stains, or residues on the mask’s surface, and don’t forget to check hidden areas such as under straps or around seals and valves.
Once identified, focus on these areas during the cleaning process. Use appropriate cleaning agents and tools to remove the dirt effectively. It’s important to target all contamination to ensure the mask’s effectiveness and longevity.
2. Cleaning the Facepiece
Cleaning the facepiece of a military gas mask is a delicate process that requires attention to detail. Ensuring that both the exterior and interior of the facepiece are properly cleaned is key to maintaining the mask’s effectiveness.
Here are some techniques:
- Gentle Washing with Soap and Water: Use a mild soap solution and gently wash the exterior. This method is effective in removing most dirt and residues without damaging the mask material.
- Using a Soft-Bristled Brush for Stubborn Dirt: For more stubborn dirt, use a soft-bristled brush. Gently scrub the affected areas to loosen and remove the dirt without scratching the surface.
- Rinsing and Drying Thoroughly: After cleaning, rinse the mask thoroughly with clean water. Ensure no soap residue is left, and dry the mask with a soft, lint-free cloth.
Here’s a video to help you understand the process better:
The interior of the gas mask also needs thorough cleaning and disinfection. Here’s how to do it effectively:
- Wipe Down with a Disinfectant: Use a cloth dampened with an appropriate disinfectant to wipe down the interior. This kills any bacteria or viruses that might be present.
- Clean Tight Spaces with Cotton Swabs: Use cotton swabs to clean tight spaces and crevices within the mask. This ensures that all areas, including those hard to reach, are cleaned.
- Air Dry in a Ventilated Area: After cleaning, let the mask air dry completely in a well-ventilated area. Avoid direct sunlight or heat sources, as these can damage the mask.
When cleaning the facepiece, special care should be taken to protect any anti-fog and anti-scratch coatings. Avoid using abrasive materials or harsh chemicals that can degrade these coatings. Instead, use gentle cleaning agents and soft cloths.
It’s important to note that if the coatings become damaged over time, they may need professional reapplication or replacement. Always refer to the manufacturer’s guidelines for specific advice on maintaining these coatings to ensure the mask remains fully functional and provides clear visibility.
3. Cleaning Filters and Canisters
Cleaning military gas mask filters and canisters is a sensitive task due to the potential for exposure to harmful substances and the specific requirements of the equipment. However, it is crucial to note that most military gas mask filters and canisters are designed for single use and are not meant to be cleaned. Once they have been used, especially in an environment with harmful agents, they should be replaced.
For cleaning the exterior or the housing of the canister, here’s a guide to follow:
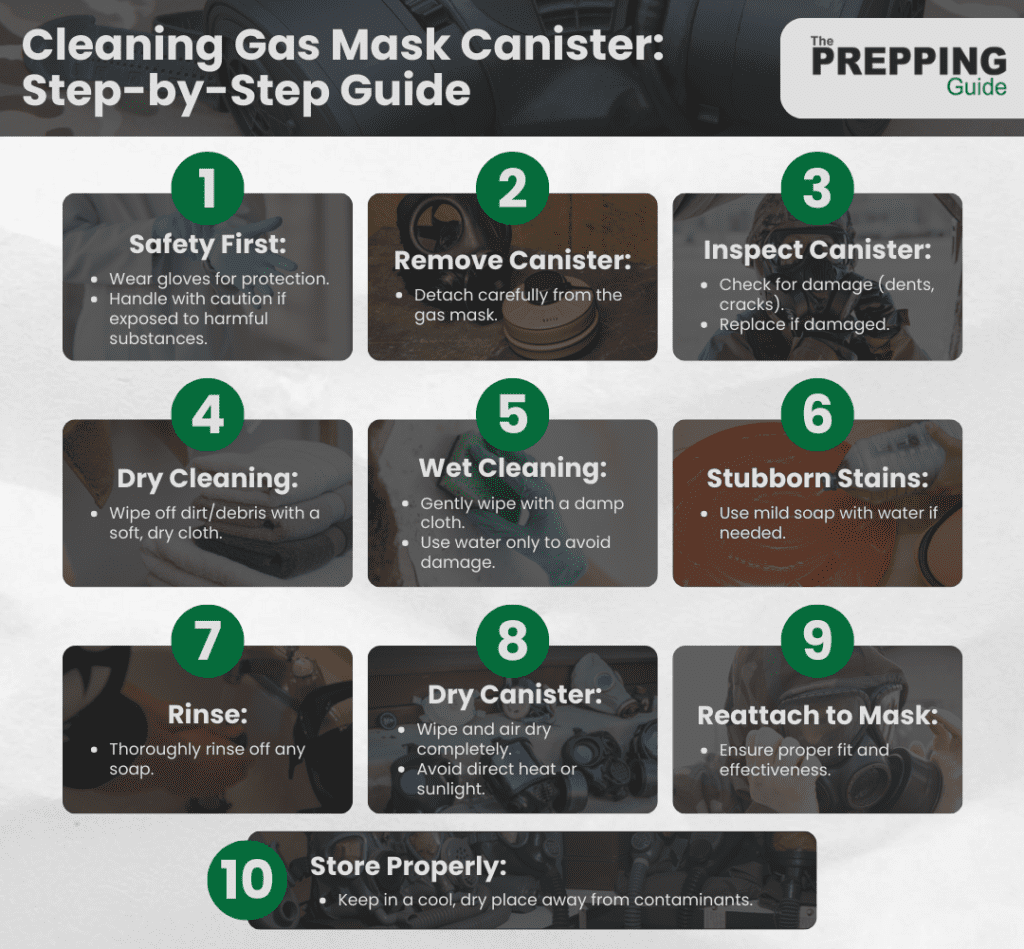
To clean a gas mask canister, start by prioritizing safety: always wear protective gloves and handle the canister carefully, especially if it may have been exposed to harmful substances.
The first step is to carefully remove the canister from the gas mask.
Before cleaning, inspect the canister for any signs of damage such as dents or cracks. If you find damage, replacing the canister rather than cleaning it is better.
If the canister is in good condition, begin cleaning by wiping off loose dirt or debris with a soft, dry cloth. Then, use a damp cloth to gently clean the exterior.
Avoid soaking it and use only water to prevent damage. If there are stubborn stains, a mild soap can be used, but ensure to rinse it off thoroughly afterward.
Once cleaned, dry the canister completely before reattaching it to the mask. Finally, store the gas mask and canister in a cool, dry place away from direct sunlight and contaminants.
Handling and Care for Activated Charcoal Filters
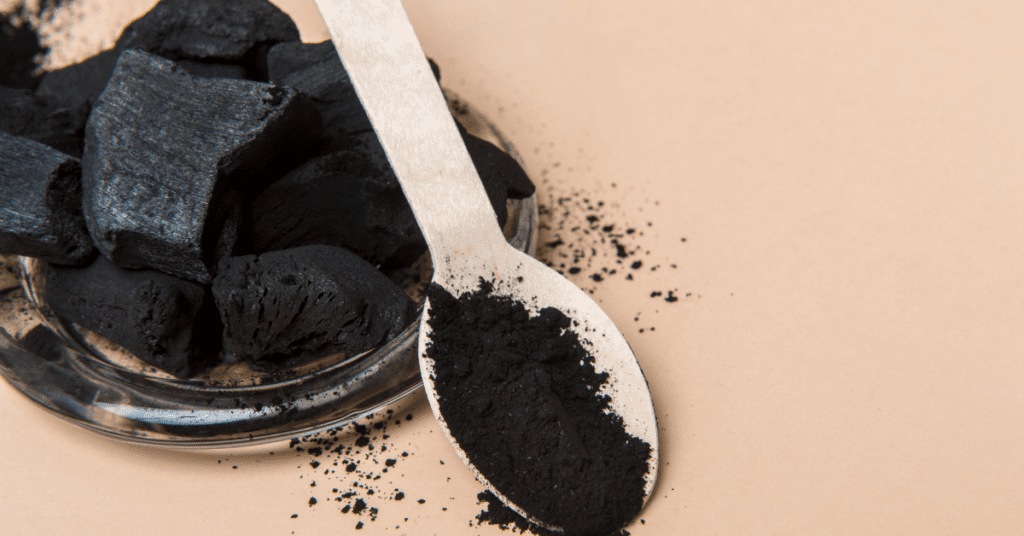
Activated charcoal filters require special attention due to their specific properties. These filters are used for adsorbing a wide range of chemical vapors and gasses but are not effective against all types of hazards. It’s important not to expose them to oil aerosols or water, as these can reduce their effectiveness.
Also, consider the storage of activated charcoal filters. They should be stored in airtight containers to prevent them from absorbing unwanted chemicals from the surrounding environment. Regularly check the expiration date of these filters, as the activated charcoal’s adsorption capacity diminishes over time, even when not in use.
4. Cleaning Straps and Head Harness
The straps and head harness of a gas mask are crucial for ensuring a secure and comfortable fit. Proper cleaning and adjustment of these components are key to maintaining the mask’s effectiveness and the wearer’s comfort.
Here are some protocols to follow:
- Gentle Washing: Clean the straps with a mild soap solution and water. Avoid using harsh chemicals, which can degrade the material and reduce elasticity.
- Air Drying: After washing, allow the straps to air dry completely. Avoid exposing them to direct heat or sunlight, as this can cause the material to weaken or degrade.
- Regular Inspection: Regularly inspect the straps for signs of wear or damage. Frayed or stretched straps can compromise the mask’s fit and should be replaced if necessary.
Adjusting the Head Harness After Cleaning
A properly adjusted head harness ensures that the gas mask fits securely and comfortably. First, adjust the straps to fit snugly but without causing discomfort. The mask should be tight enough to maintain a good seal but not so tight as to cause pressure points or impede circulation.
Focus on checking the harness’s fit regularly, especially if the mask is used frequently. Over time, straps may stretch or wear, necessitating readjustment. Also, consider the individual’s hair and headgear when adjusting the harness, as these can affect the fit.
Here’s how to adjust your mask for proper fit:
- Start with the Mask Off: Begin with the mask off your head. Loosen all the straps to their fullest extent. This will make it easier to put the mask on and adjust it from a neutral starting point.
- Position the Mask: Hold the mask up to your face, making sure it aligns correctly with your eyes, nose, and mouth.
- Secure the Head Harness: Pull the head harness over the back of your head. The harness should sit comfortably and snugly without being too tight. Ensure it’s not twisted and is evenly spread across the back of your head.
- Adjust the Straps Evenly: Start tightening the straps, beginning with the ones closest to the front of the mask, usually around the chin area. Then move to the upper straps. It’s important to adjust each strap a little at a time and to do so evenly on both sides to maintain a balanced fit.
- Check for Comfort and Seal: Once all the straps are tightened, the mask should feel secure but not uncomfortably tight. You should be able to breathe easily without any air leaks. To check for leaks, you can perform a seal check as per the manufacturer’s instructions or standard military procedures.
- Final Adjustments: Make any final adjustments to the straps for comfort and seal. Remember that a proper seal is crucial for the mask’s effectiveness.
5. Cleaning Valves and Connectors
Regular cleaning and maintenance of gas mask valves are essential for their proper function. First, clean the valves with a gentle solution, ensuring that no debris or residue is blocking them. Be careful not to use harsh chemicals that could damage the valve material.
Also focus on lubricating the valves if necessary. Use a silicone-based lubricant, which is safe for most materials used in gas masks. Ensure the valves move freely and seal properly, as any malfunction could compromise the mask’s effectiveness.
6. Reassembly
After thoroughly cleaning and inspecting each component of the military gas mask, the next crucial step is reassembling it correctly. Proper reassembly ensures that the mask functions as intended and offers full protection.
Here are the steps for effective reassembly:
- Reattach the Facepiece to Other Components: Begin by reconnecting the facepiece to any detached components like lenses or voice diaphragms. Make sure each piece is securely fastened and properly aligned to avoid any gaps or loose fittings.
- Attach the Head Harness or Straps: Next, reattach the head harness or straps. Ensure they are correctly positioned and not twisted, as this affects the fit and comfort of the mask.
- Reinstall the Filters or Canisters: Finally, screw or attach the filters or canisters back onto the mask. Double-check to ensure they are tightly sealed and correctly positioned for optimal filtration.
Verifying Proper Fit and Function Post-Cleaning
Once the gas mask is reassembled, it’s important to verify its fit and functionality. This ensures the mask will provide adequate protection when needed. Here are the steps to follow:
- Check the Fit of the Mask: Put on the gas mask and adjust the straps for a snug fit. The mask should feel secure but not overly tight, and there should be no discomfort or pressure points.
- Test the Seals: Press your hands gently over the filters and inhale slightly. The mask should collapse slightly against your face, indicating a good seal. If air leaks in, readjust the fit or check for misaligned components.
To do a leak test, you can do a negative pressure test or a positive pressure test.
Perform a Negative Pressure Test: Cover the filter inlets with your palms and try to inhale. The mask should collapse against your face, and you should not be able to inhale any air. If air enters, there’s a leak that needs fixing.
Perform a Positive Pressure Test: Cover the exhalation valve and exhale gently. The mask should slightly bulge out, and no air should escape from the seal. If you feel air escaping around the edges, there’s a leak in the seal.
- Inspect the Components: Make a final check of all components, including the lenses, valves, and straps, to ensure they are secure and functioning correctly. Everything should be in place, and there should be no loose parts.
Troubleshooting and Common Issues When Cleaning Military Gas Masks
Even with meticulous care, gas masks can sometimes encounter issues after cleaning. Understanding how to troubleshoot common problems is essential for maintaining the mask’s functionality and ensuring safety.
After cleaning a gas mask, several issues might arise.
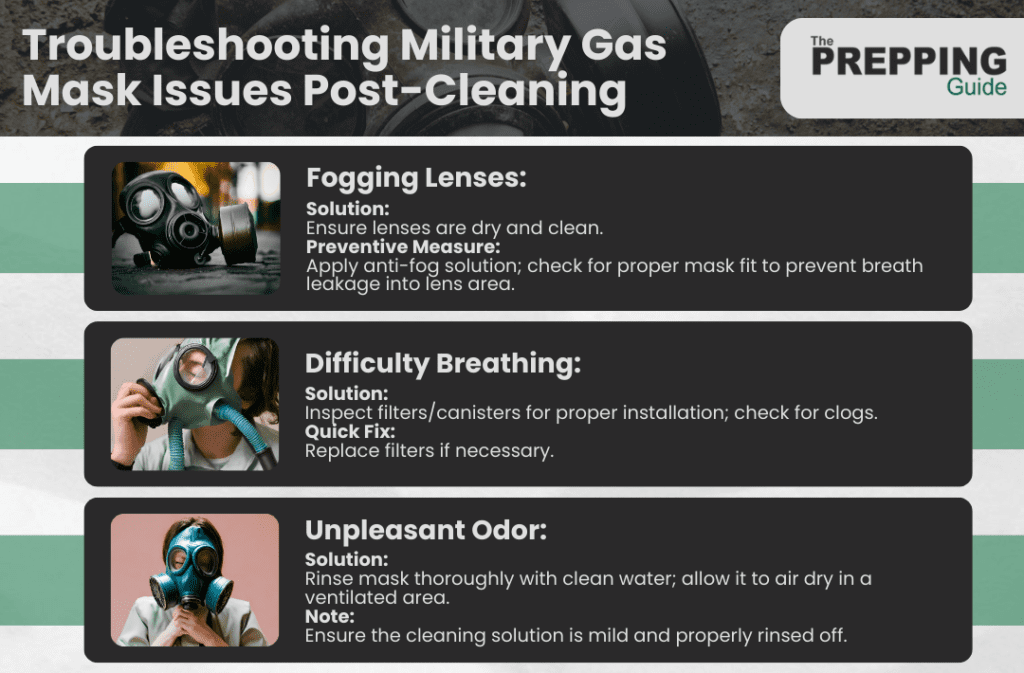
Here’s how to address them:
- Reduced Visibility Due to Fogging: If the mask’s lenses fog up, ensure that they are completely dry and clean. Applying an anti-fog solution can help prevent this issue. Also, check that the mask fits snugly and that no breath is escaping into the lens area.
- Difficulty Breathing: If breathing through the mask becomes difficult, check the filters or canisters for proper installation and ensure they are not clogged or incorrectly attached. Sometimes, simply replacing the filters can resolve this issue.
- Unpleasant Odor: A residual odor after cleaning can occur if the mask hasn’t been rinsed properly or if the cleaning solution used was too strong. Thoroughly rinse the mask with clean water and let it air dry completely in a well-ventilated area.
Knowing When to Seek Professional Gas Mask Maintenance
There are situations when professional maintenance for your gas mask is necessary. If you encounter complex issues like structural damage, compromised seals that you cannot fix, or if the mask has been exposed to hazardous materials beyond its capacity, it’s time to seek professional help.
Recognize that professional maintenance is also advisable when dealing with sophisticated components or if the mask is used in high-risk environments. Professionals have the expertise and equipment to conduct thorough inspections, repairs, and replace parts as necessary, ensuring the mask provides optimal protection.
The Importance of Following Military Cleaning Protocols
Following military cleaning protocols is crucial for the effectiveness and longevity of gas masks. These protocols are designed to ensure that every part of the mask is cleaned and maintained correctly, thereby preserving its integrity and functionality.
Acknowledge that adhering to these protocols also ensures that the masks provide the maximum level of protection for users. Ignoring these guidelines can lead to inadequate cleaning, resulting in reduced effectiveness of the masks in critical situations.
Final Thoughts
Proper maintenance, cleaning, and troubleshooting of military gas masks are crucial for their effective and safe operation. By understanding and adhering to the detailed guidelines, users can ensure their gas masks provide the necessary protection when faced with hazardous environments. Regular maintenance, along with adherence to military standards, is the key to ensuring the longevity and reliability of these essential safety devices.