Lost. Disoriented. Stranded. These are words that send shivers down even the most adventurous spines. Whether you’re an experienced hiker who took a wrong turn or someone facing an unexpected car breakdown in a remote area, the ability to send an emergency signal can be the difference between a night of worry and a successful rescue.
To send an emergency signal, use your cell phone to call emergency services immediately. For non-electronic options, create a large international distress signal using six orange squares and utilize a signal mirror to reflect sunlight towards the aircraft, or make audible signals using a whistle.
This guide will equip you with the knowledge and practical steps to send an emergency signal, regardless of the environment. We’ll delve into various methods, from utilizing readily available materials to leveraging technology designed for such situations.
Basic Principles of Emergency Signaling
In my 15 years navigating the wilderness – from scorching deserts to snow-capped peaks – I’ve encountered countless situations where clear communication became paramount. Let me assure you that even the most seasoned outdoorsman can find themselves in a predicament where a simple cell phone signal vanishes. That’s why knowing alternative ways to send an SOS is an essential skill for anyone venturing beyond the comforts of civilization.
Before diving into specific methods, let’s establish fundamental principles for all emergency signaling techniques. These guiding principles will ensure your signal is effective and increase the likelihood of a prompt rescue.
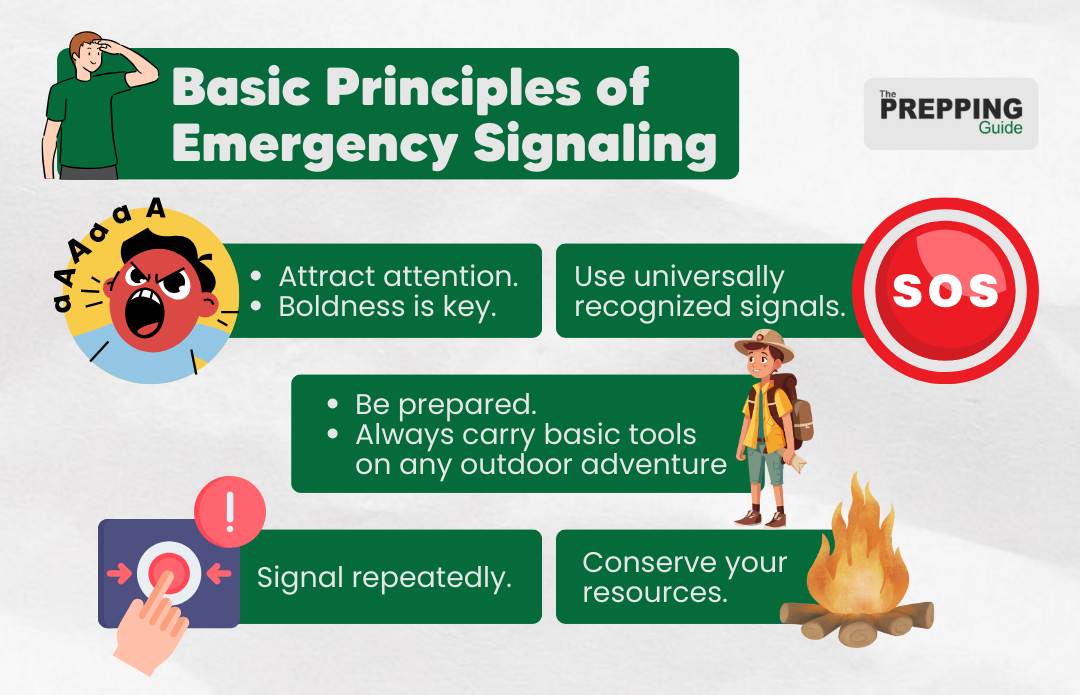
1. Attract attention.
The primary goal of any emergency signal is to grab rescuers’ attention. Boldness is key. Bigger is usually better, and aiming for high visibility is crucial. Fires, bright colors, and loud sounds are all excellent ways to stand out, especially in dense wilderness or vast open areas.
2. Use universally recognized signals.
While improvisation may be necessary in certain situations, it’s always wise to prioritize signals universally recognized by search and rescue teams. This includes the international distress symbol – SOS (three short bursts, three long bursts, three short bursts) – which can be transmitted through various means, like fire signals, flashes of light, or audible distress calls.
3. Conserve resources.
While attracting attention is essential, remember that resources might be limited in emergencies. Be mindful of how you use materials for signaling, especially if you anticipate an extended wait for help. Prioritize methods that offer sustained visibility or audibility without rapidly depleting your resources.
4. Signal repeatedly.
Don’t send a single distress call and wait passively. Emergencies are dynamic situations, and rescuers might miss a one-time signal. Repeat your chosen method consistently at regular intervals. This persistence increases the chances of your call being detected, especially in challenging weather conditions or dense terrain.
5. Be prepared.
The best emergency signal is the one you don’t have to improvise. Always carry basic signaling tools on any outdoor adventure, regardless of difficulty. A small mirror, a whistle, or a high-visibility emergency blanket are lightweight additions to your backpack that can make a world of difference in a critical situation.
By following these fundamental principles, you can ensure your emergency signal is clear and effective. It increases your chances of a successful rescue. Remember, staying calm, thinking strategically, and utilizing readily available resources or prepared tools are all crucial aspects of effective emergency signaling.
Types of Emergency Signals
Now that we’ve established the core principles of emergency signaling, let’s explore the various methods at your disposal. Each technique has strengths and weaknesses, and the optimal choice will depend on the specific situation and available resources.
Here’s a breakdown of some common and effective emergency signals:

1. Visual Signals
These signals rely on attracting attention through sight. They are particularly effective in clear weather conditions and open areas. For example, a well-constructed fire, especially one producing a thick column of smoke, is a classic and universally recognized distress signal. A small, lightweight mirror can reflect sunlight over vast distances, making it an excellent tool for attracting rescuers.
Emergency signal flares are other single-use devices that produce bright-colored light or smoke, ideal for daytime or nighttime signaling. And lastly, large, brightly colored panels are often used by groups or in maritime emergencies. These are the common visual signals you can make in an emergency.
2. Audible Signals
These signals rely on sound to attract attention and are particularly useful in situations with limited visibility, such as fog or dense foliage. For example, a loud whistle is a compact and reliable way to send a distress call. The internationally recognized SOS pattern (three short blasts, three long blasts, three short blasts) is easily produced with a whistle and can be heard over long distances.
If a whistle isn’t available, rhythmically banging on a hard object, such as a rock or a metal pot, can create a loud, attention-grabbing sound. Aim for a consistent pattern to differentiate your signal from random noise.
3. Electronic Signals
Technology has introduced new tools for emergency signaling. A Personal Locator Beacon (PLB) is a compact, battery-powered device that transmits a distress signal directly to search and rescue satellites. This provides rescuers with your precise location, significantly increasing the speed of your rescue. However, PLBs require registration and can be expensive.
On the other hand, emergency Position-Indicating Radio Beacon (EPIRB) devices are primarily used for maritime emergencies and function similarly to PLBs, transmitting distress signals to search and rescue satellites. Owning an EPIRB is a legal requirement for some types of vessels.
4. Ground-to-Air Signals
In some situations, attracting the attention of low-flying aircraft might be the best option. Sample methods for this type of signal include the international distress signal (SOS) and a large X formation or triangle formation on the ground.
How to Send an Emergency Signal
Knowing how to send an emergency signal can be the key to swift rescue and assistance in critical situations. Communicating distress effectively is paramount whether you find yourself lost in the wilderness, stranded at sea, facing a medical emergency, or other unforeseen circumstances.
Electronic Signals
In an emergency, electronic communication should be your first priority whenever possible.
Here’s how to utilize various electronic means to signal for help:
1. Mobile phone
Knowing how to make emergency calls on your mobile phone is crucial. The process may vary slightly depending on your operating system (Android or iOS) and location, but generally:
For Android:
- Open the phone app.
- Dial the emergency number for your location (usually 112 or 911).
- Explain the nature of your emergency to the dispatcher.
For iOS:
- Open the phone app.
- Dial the emergency number for your location (usually 112 or 911).
- Slide the emergency SOS slider to call emergency services (iPhone 8 or later) or rapidly press the side button five times (iPhone 7 or earlier).
- You can also set up Emergency SOS to automatically send your location and medical ID (if enabled) to your emergency contacts after the call ends.
Many modern smartphones come with built-in Emergency SOS features. These features can be helpful in various ways, depending on the specific phone model and operating system. Here are some common functionalities:
- Sending your location to emergency contacts.
- Triggering a loud alarm to attract attention.
- Sharing a short video recording of the situation.
2. Satellite Communication
For situations beyond cellular coverage, consider these options:
Satellite phones: While expensive to purchase and use, satellite phones offer the ability to make calls and send texts from remote locations.
Emergency SOS via Satellite (iPhone 14 and later): This feature allows iPhone users to send text messages to emergency services using a satellite connection, even without cellular or Wi-Fi coverage.
3. Personal Locator Beacons (PLBs)
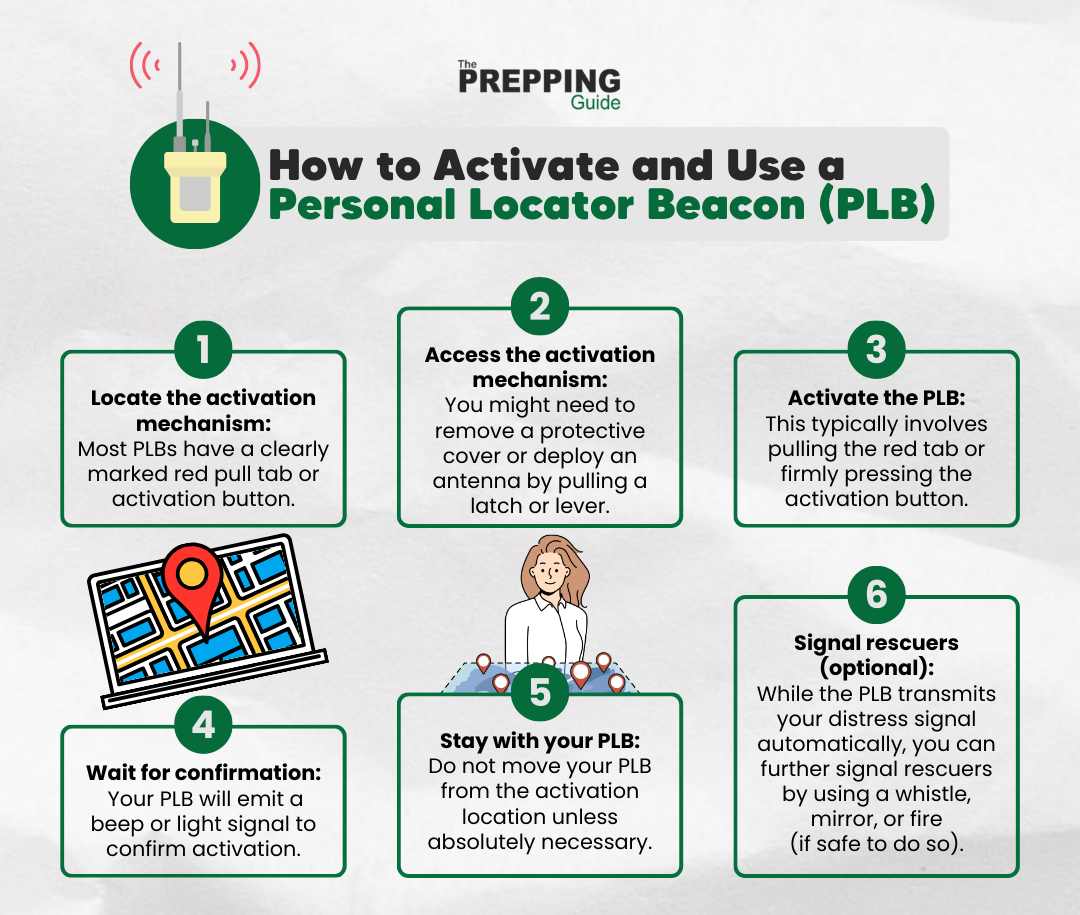
PLBs are small, battery-operated devices that can send a distress signal to search and rescue satellites. When activated, a PLB will transmit your location to emergency services, allowing them to locate you. PLBs are a good option for hikers, campers, and others who spend time in remote areas.
Here’s a step-by-step guide on how to activate and use a PLB.
4. Other Electronic Devices
Portable HAM Radios: These radios can be used to communicate with other HAM radio operators in an emergency, even if there is no power or cell service. However, using a HAM radio requires a license and some technical knowledge.
GPS communicators: These devices combine GPS functionality with two-way satellite communication. They can be used to send SOS alerts, track your location, and send and receive text messages.
Visual and Ground-to-Air Signals
Visual signals are a crucial way to communicate distress, especially in off-grid communication. Here are some common international distress signals:
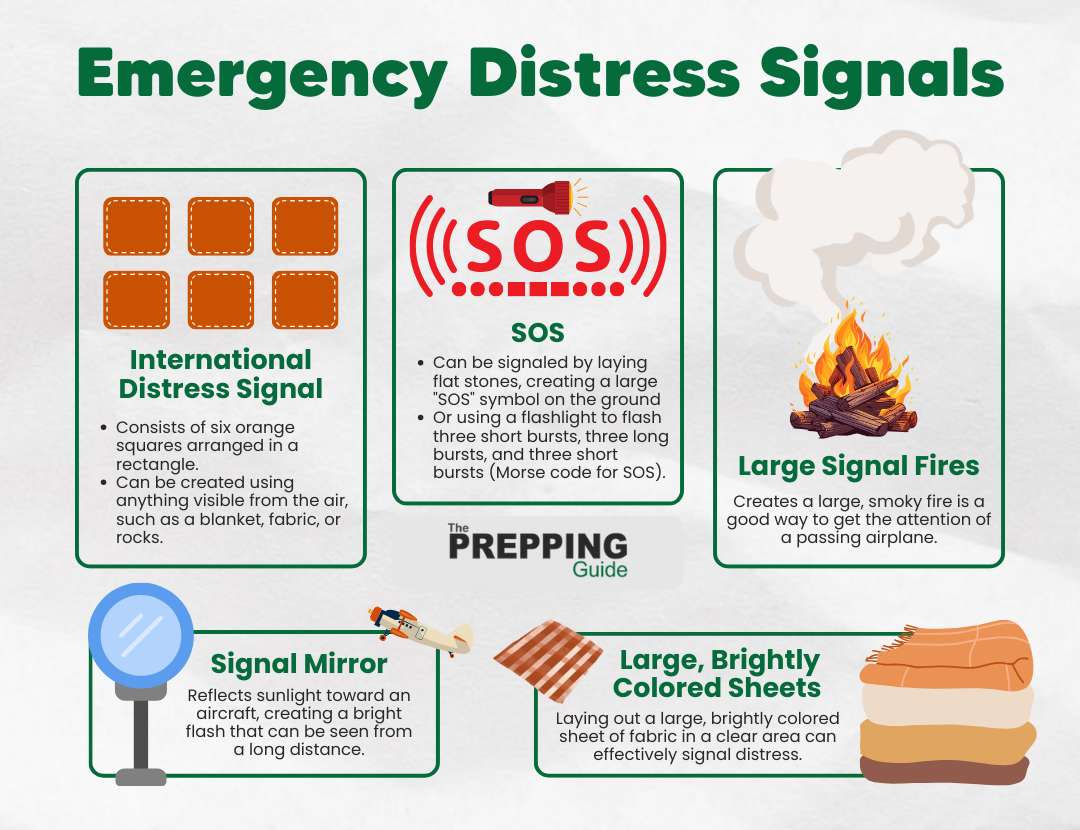
1. International Distress Signal
This universal symbol of distress consists of six orange squares arranged in a rectangle (two rows of three squares). It can be created using anything visible from the air, such as a blanket, fabric, or rocks.
2. SOS
This internationally recognized distress signal can be signaled by laying flat stones, creating a large “SOS” symbol on the ground, or using a flashlight to flash three short bursts, three long bursts, and three short bursts (Morse code for SOS).
3. Large Signal Fires
Creating a large, smoky fire is a good way to get the attention of a passing airplane. However, only do this if there is no immediate danger of the fire spreading. Use caution and only build a fire if it’s safe to do so.
4. Signal Mirror
A signal mirror reflects sunlight toward an aircraft, creating a bright flash that can be seen from a long distance.
5. Large, Brightly Colored Sheets
Laying out a large, brightly colored sheet of fabric in a clear area can effectively signal distress. Make sure it is large and easy to see from the air. Choose a location with a clear sky view and avoid placing your signals in shadows or tall grass.
Audible Signals
Audible signals are another way to attract attention in an emergency. Here are a few common methods:
1. Blowing a whistle.
A whistle is a compact and easy-to-use tool that can produce a loud, shrill sound that carries well.
2. Shouting
While not the most effective way to signal for help over long distances, shouting can be useful in close quarters or when combined with other signals like a whistle.
When blowing a whistle or shouting for help, use a three-blast pattern (short blast, long blast, short blast) to clearly indicate distress. This is a universally recognized distress signal. Additionally, avoid shouting or blowing a whistle near cliffs or avalanche zones where the sound could trigger a dangerous event.
When to Send an Emergency Signal
Knowing when to send an emergency signal is just as crucial as knowing how to send it effectively. While the urge to call for help might be strong in any unsettling situation, responsible signaling requires a measured approach.
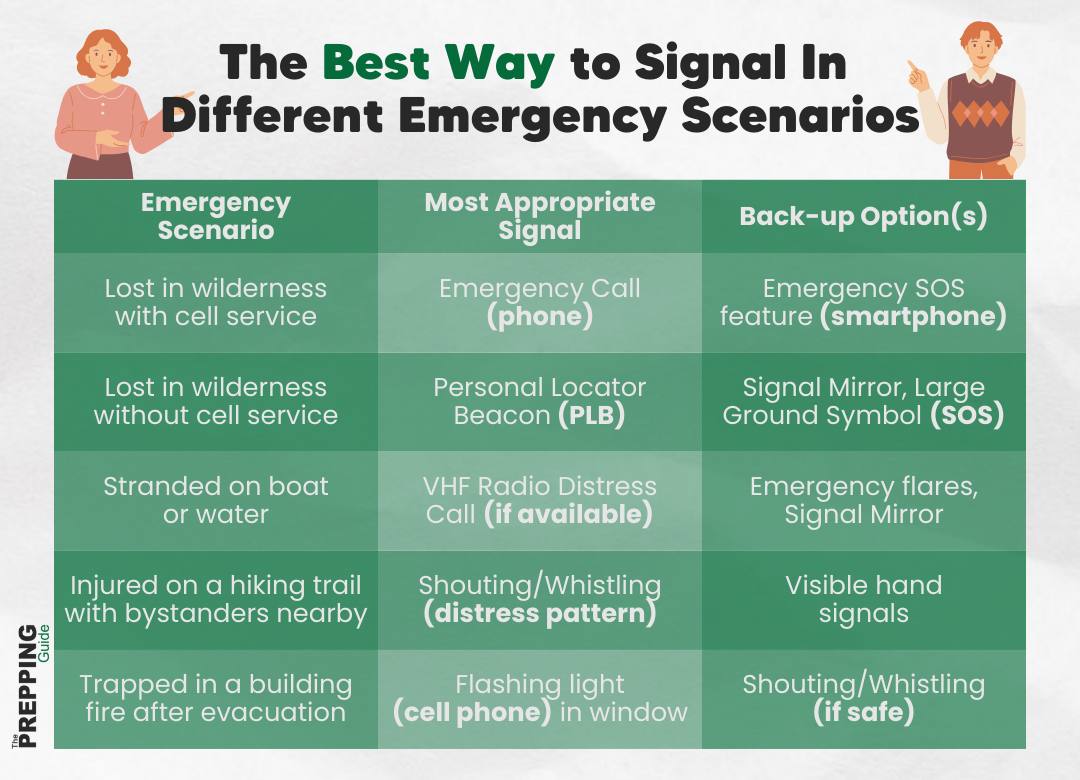
Emergencies Requiring a Signal
Serious Injury: If you’ve sustained a severe injury that hinders your ability to move or care for yourself, sending an emergency signal is essential. Don’t hesitate to call for help in such situations. Every minute counts when dealing with serious medical emergencies.
Lost and Unable to Self-Navigate: If you’re lost and disoriented and attempts at self-navigation prove futile, sending an emergency signal becomes critical. Remember, rescuers have a much better chance of locating you if they know where to start searching.
Deteriorating Weather Conditions: Sudden weather changes can quickly turn a manageable situation into a life-threatening one. If you’re caught in a blizzard, flash flood, or any other rapidly worsening weather scenario, don’t wait until it’s too late. Send a distress signal as soon as possible.
Exhaustion or Lack of Resources: The wilderness can be unforgiving, and even experienced outdoorsmen can become exhausted or depleted of essential resources like food or water. In this situation, sending a signal for help is the responsible course of action.
The ICAR publishes annual statistics on mountain rescue missions worldwide. While not a single study, this data consistently shows a correlation between faster activation of emergency services and higher survival rates in mountain accidents. Rescues initiated within the first hour of an incident tend to have significantly better outcomes than those with delayed activation.
These studies indirectly support the idea that early activation of emergency signals, regardless of the specific emergency type, is crucial for improving rescue outcomes. Faster notification allows search and rescue teams to deploy resources sooner, potentially leading to a quicker rescue and a higher chance of survival for the victim.
Avoiding Unnecessary Signals
While it’s crucial to err on the side of caution in an emergency, it’s also important to avoid sending unnecessary signals. Here are some situations where you might hold off:
Temporary Disorientation: If you’re momentarily lost but plan to regain your bearings, consider waiting before sending a signal. Utilize your map and compass skills to navigate back to safety.
Minor Injuries: For minor injuries that don’t impede your ability to move or care for yourself, focus on self-treatment and consider seeking help upon returning to civilization.
False Alarms: Accidentally triggering a PLB or EPIRB can trigger a costly and time-consuming rescue operation for search and rescue teams. Be absolutely certain you’re in a genuine emergency before activating these devices.
Remember, the goal is to use emergency signals responsibly and effectively. Understanding when to send a distress call can ensure rescuers are directed to those who truly need assistance.
Additional Tips and Considerations
Emergency preparedness goes beyond just knowing how to send distress signals. Here are some additional tips that can increase your chances of a successful rescue.

1. Preparing an Emergency Kit
An emergency kit should contain essential supplies to help you survive until help arrives. The contents of your kit will vary depending on your location and planned activity, but some general recommendations include:
- First-aid kit
- Non-perishable food and water
- Warm clothing and blankets
- Flashlight and extra batteries
- Whistle
- Signal mirror
- Emergency shelter (tarp or emergency blanket)
- Fire starter
- Map and compass (or GPS device)
- Personal locator beacon (PLB) (optional, but highly recommended for remote areas)
2. Informing Other of Your Plans
Before heading out on a hike, camping trip, or any activity in a remote area, always let someone know where you are going, your planned route, and when you expect to return. This will allow them to raise the alarm if you don’t return as expected.
3. Staying Calm and Focused
When faced with an emergency, staying calm and focused is important. Panic can cloud your judgment and make it difficult to think clearly. Take a few deep breaths and assess the situation. Remember your training and use the available resources to signal for help.
4. Practicing Sending Signals
Don’t wait for an emergency to learn how to send distress signals. Take some time to practice using your emergency kit, including your whistle, signal mirror, and any electronic devices you plan to use. Familiarize yourself with international distress symbols and practice creating them on the ground.
Various journals by the Disaster Research Center examined the impact of pre-crisis planning and drills on emergency preparedness. The journals found that individuals and communities engaged in pre-crisis planning and practiced emergency drills were better equipped to respond effectively during emergencies.
So, by following these additional tips and practicing your emergency skills, you can be better prepared to handle any situation and increase your chances of a safe rescue.
Here’s a great informational video on sending emergency signals in the wilderness.
Remember, Help is a Signal Away
While modern technology offers incredible tools for navigation and communication in the wilderness, mastering traditional techniques like map and compass reading remains vitally important. If your electronic devices fail, understanding natural landmarks and basic wilderness survival skills can be the difference between life and death.
But true preparedness goes beyond just knowing skills. It’s about practicing those skills regularly, having a well-stocked emergency kit, and learning new ways to stay safe outdoors.
Here at The Prepping Guide, we aim to empower you with the knowledge and resources you need to navigate any situation. We provide expert advice, in-depth guides, and comprehensive resources on wilderness survival, emergency preparedness, and disaster planning. Whether you’re a seasoned outdoorsman or a weekend hiker, we can help you build the confidence and skills to stay safe and survive in the wild.
Remember, knowledge is power, and preparation is key. Combining traditional skills with modern tools, practicing your emergency response, and staying informed can significantly increase your chances of a happy and safe adventure in the wilderness.
FAQs
1. I’m going on a short hike in a well-traveled area. Do I really need an emergency kit?
Even on short hikes, it’s always better to be safe than sorry. A basic emergency kit with a whistle, first-aid supplies, and a light source can provide peace of mind and be helpful in case of an unexpected injury or mishap.
2. Should I invest in a Personal Locator Beacon (PLB) for my wilderness adventures?
PLBs are a valuable safety tool for venturing into remote areas. They allow you to send a distress signal directly to search and rescue services, regardless of cell phone coverage. While not essential for every trip, a PLB can significantly increase your chances of a swift rescue in a critical situation.
3. Can I use visual signals in urban or densely populated areas?
While visual signals like large signal fires may not be suitable in urban settings, other methods can be effective. Utilize brightly colored sheets or fabric in open areas, and consider signaling with a flashlight, especially during nighttime emergencies. In urban environments, audible signals like blowing a whistle or shouting can also be valuable.
