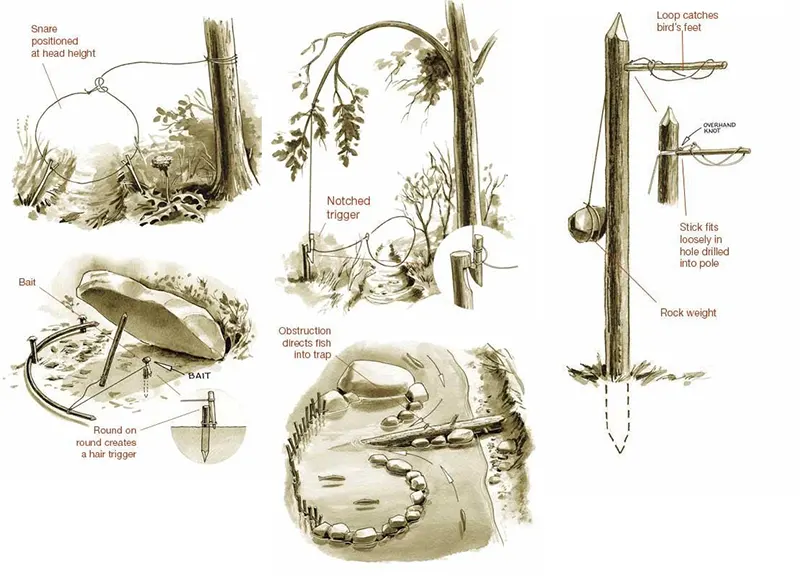
Trapping is one of the best ways to find a food source when you are off the grid or in a survival situation. It helps ensure that you have enough protein to overcome extreme conditions.
A deadfall trap consists of a weight (a flat rock or log) neatly placed on a trigger that is simple to trip. The trigger is pushed and lowered when a tiny animal tries to eat the bait, causing the weight to fall on the prey and either kill or capture it.
Whether you’re looking to build your own or want to know what kind of trap would be best for your situation, read on. This article aims to help you learn more about deadfall traps and their different types.
How Do Deadfall Traps Work
Since the beginning of civilization, people have used deadfall traps to target species and capture prey, and they continue to prove their effectiveness.
This simple trapping device works by entrapping wildlife using a large boulder or logs supported by sticks. When the animal accepts the bait, the sticks collapse, instantly crushing them under the weight. It is a simple and efficient method to get a meal, particularly if you don’t have access to contemporary resources.
Now, what can you catch with a deadfall trap?
You may capture animals of all kinds with it. They most often range in size from a small animal to medium-sized mammals. However, you may also capture birds and reptiles of comparable sizes, such as quails, ducks, turkeys, ducks, lizards, and snakes.
3 Types of Deadfall Traps
There are three basic types of deadfall traps and each has its own unique characteristics.
Figure 4 Deadfall Trap
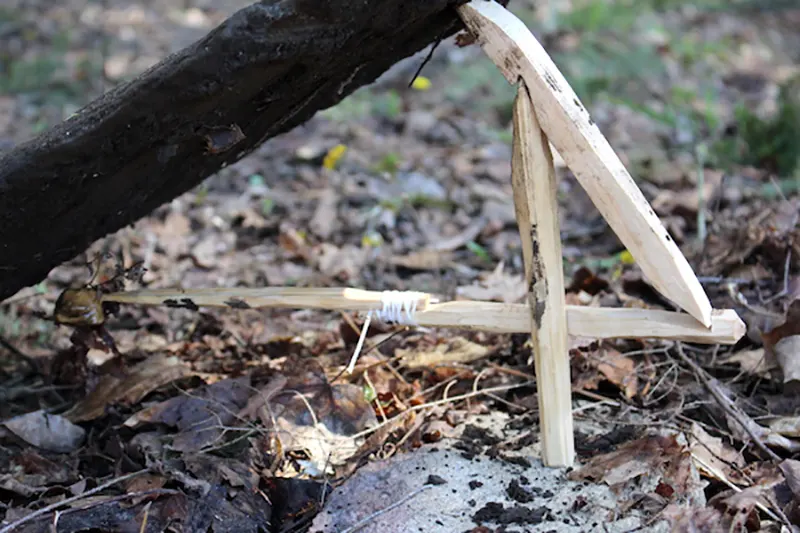
One of the most straightforward primitive traps is a Figure 4 deadfall trap, which requires a few sticks, a sharp knife, and bait. There is no need for cordage or intricate snare knots; instead, a few sticks keep a large boulder in place while they wait for the animal to trigger them.
You may make the Figure 4 trap out of only three sticks, each approximately 8 inches long and 1 1/2 inches in diameter. This measure only serves as an example since, in a real-world trapping situation, the size of these sections will entirely depend on the size of the animal you plan to capture.
From there, it is possible to cut each stick into a simple tension deadfall trap that assembles without the need for cordage or snares.
If the notches have the proper design, the boulder’s weight presses down on the sticks, creating tension that keeps the whole deadfall trap together. If the baited end is even slightly touched, the entire structure collapses, ideally crushing your victim.
Figure 4 traps are fantastic in regions with abundant giant, somewhat flat boulders. Small wildlife, such as squirrels or maybe raccoons, is best suited for these multiple traps.
Three components make up the deadfall trap; they can be called the vertical piece, diagonal piece, and trigger piece. To stretch the trigger farther beneath the flat rock, add a fourth piece and tie it together with some twine.
Start with carving the vertical piece since it is the easiest. It is simply a stick with a tip. Only two of the faces of the point are cut, resulting in a long, linear point at one end.
It makes it simpler to set the trap when using a flat surface as a work area. Simply hooking into the notch on the diagonal piece will do. Regarding the first piece, there is one more crucial point: the sides must be squared off to enable the trigger component to attach to the stick.
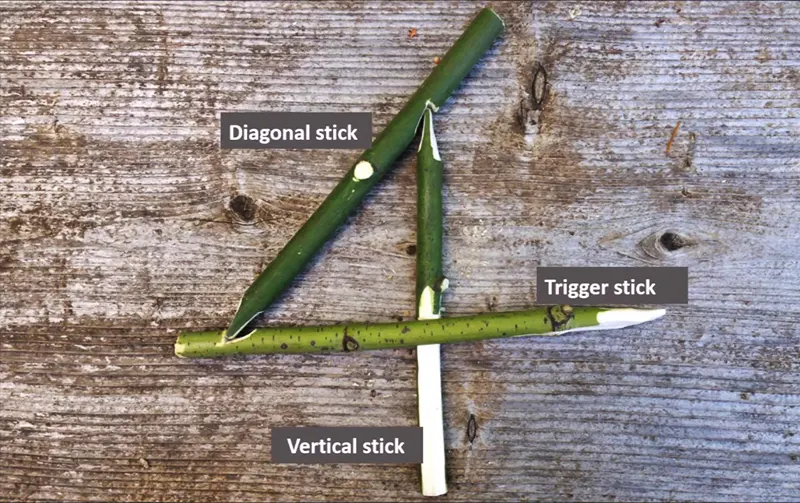
The diagonal piece carving comes next; it is a little trickier and contains carvings on both ends. The bottom features a little notch for retaining the vertical stick, and the top has a rounded tip that will support the rock.
Round the top end first, then cut a 2-inch notch into the stick below that. When they are linked, the hook-like quality of the notch will assist hold the vertical piece in place.
Create a point at the bottom of the same stick by just working on two sides, creating a long seam that may hook onto the third piece (trigger piece). The trigger stick, or the horizontal piece in the figure 4 trap, is the last component. The tension in the trigger is produced by its attachment to the side of the vertical component.
To tighten the trap, start by cutting a slot in the back of the stick. Ensure enough wood is left over at the end so it won’t collapse under pressure. It ought to be around one inch. The bottom of the diagonal stick should easily accommodate this slot. Then, at the other end, make a small point to retain the bait.
Place the components in Figure 4 position after you’ve completed the trigger point and that notch to determine where the side trip notch should go. Carve out the trigger notch squarely to ensure that the trigger stick hooks around the vertical stick.
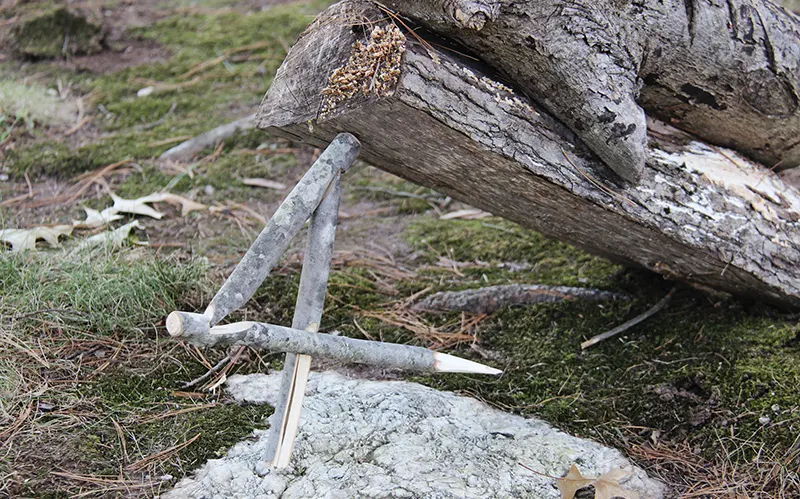
Paiute Deadfall Trap
The first Paiute Indian cultures used deadfall traps hundreds, if not thousands, of years ago. The Northern Paiute, the Owens Valley Paiute, and the Southern Paiute are the three Paiute tribes that the government now recognizes.
Anyone acquainted with the Paiute homeland’s rough terrain is aware that there are a lot of rocks around and that other resources are often in short supply.
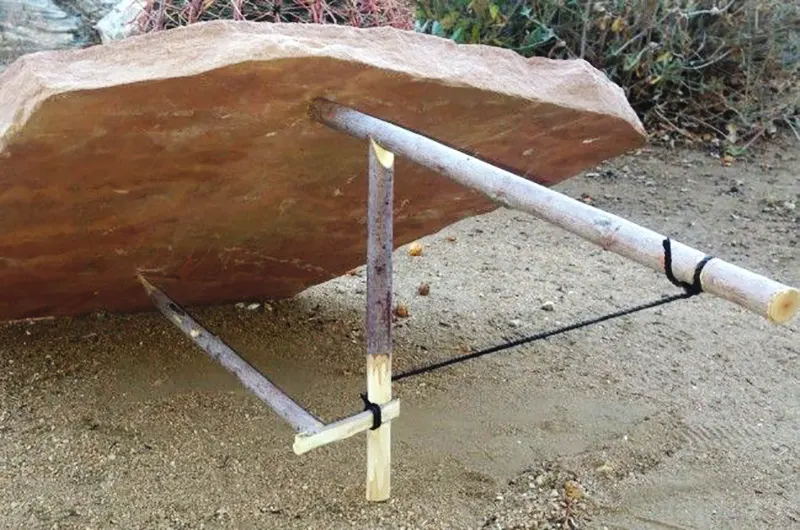
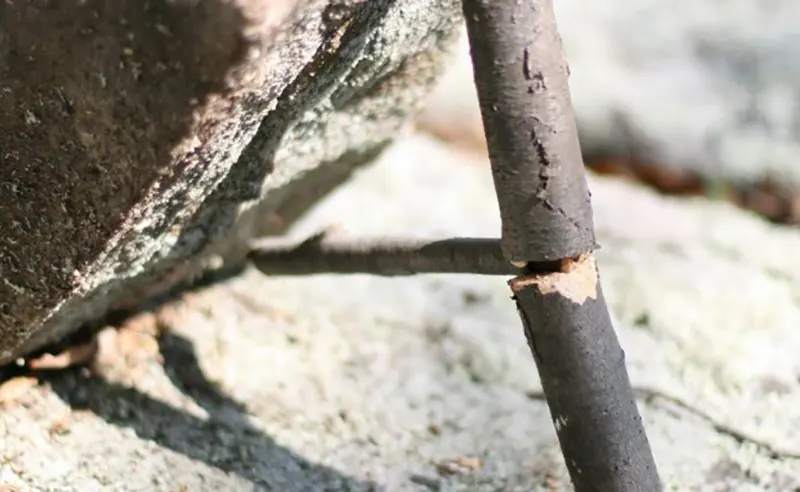
The Paiute trap has three straight pieces of wood and a minor bit. Compared to the Figure 4 trap, which requires seven cuts, this method requires two cuts—a flat edge and a notch.
The vertical, the diagonal, the bait stick, and the trigger are the four pieces. A small length of cordage is also required; unless you’re creating a particularly giant trap, one foot (30 cm) should be plenty. Also needed is weight.
The vertical, the diagonal, and the bait stick are the components of the Paiute trap, not counting the rock. Due to the bait stick’s delicate balance between the rock and the trigger, this trap is very sensitive (the small stick).
The weight of the stone weighs down the top of the diagonal piece. The diagonal part swings outwards because of the weight. The cord restraints the diagonal from swinging outward; therefore, it is tugging on the cord.
The small trigger piece to which the cord is hooked holds it at this end while it loops around the vertical component. This causes the trigger piece’s frontmost end to try to travel to the right.
The whole assembly collapses to the ground at the slightest movement of the bait stick or trigger piece, and the heavy rock lands on everything below.
The top of the vertical component receives the initial cut, a two-sided flat edge. The notch at the top of the diagonal is the second cut. You may swiftly cut a notch using the Swiss army knife’s saw to cut the notch’s short edge. Finish the notch by cutting toward it with a sharp knife after making this incision.
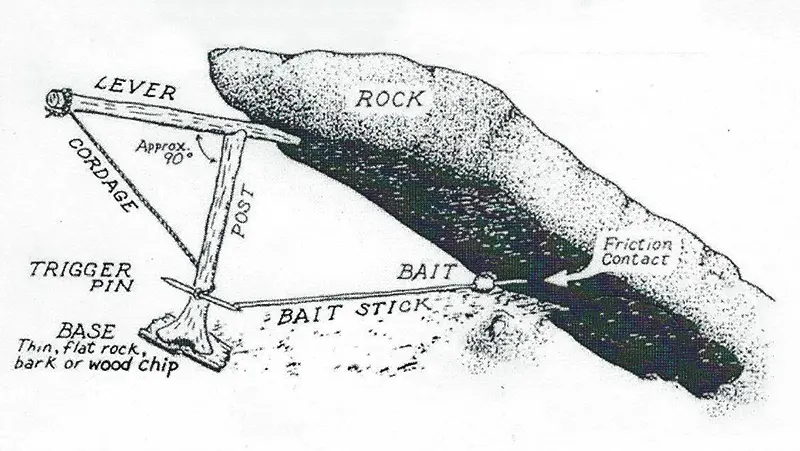
When the trap is put together, the flat edge of the vertical fits into the notch of the diagonal. With the slack end of the cable dropping down closer to the center of the image, the cord’s leftmost portion is bearing the weight.
The boulder exerts downward and leftward pressure on the bait stick, which is the rightmost component.
Due to its reliance on balance, the Paiute deadfall trap is a particularly delicate device.
Split Stick Deadfall Trap
Making a split-stick deadfall trap is not too difficult. It only needs a trigger, causing a giant boulder or log to fall on top of the prey. Three sticks and a big rock are required. Two sticks should be pretty thick to support the stone and provide a decent contact area.
The same idea as a Figure 4 deadfall is used in Split Stick, another trigger for a deadfall that needs less notching. You will need three sticks in addition to a big rock or a basket of some type. Although it may be the simplest to construct, setting it might be challenging.
It requires a knife, a sizable rock, two pieces of wood, each about an inch thick and four inches long, one about half a centimeter thick, and eight inches long in a long rectangular shape.
The split-stick deadfall trap is a hybrid of the Paiute and Figure 4. Like the Paiute, it has an extremely sensitive trigger, but unlike Figure 4, it doesn’t need cordage.
Chop a long stick in half. Next, cut notches onto the places where they meet so they may fit loosely together. To make the trap more sensitive, don’t forget to add a bigger notch in one of the sticks.
Then sandwich a tiny, thin stick between these two halves. You will use this as your trigger. When the intended animal accepts the bait, the whole structure collapses, crushing them under the weight of the deadfall.
That’s how simple it is.
The split stick deadfall trap’s potential vulnerability to easy collapse owing to external forces like the wind may be its lone drawback. However, it helps hone your bushcraft trapping abilities and catch an animal simultaneously.
Deadfall Triggers Comparison
The trigger mechanism varies greatly from trap to trap, even though many different deadfall versions exist. The trigger should be powerful enough to support the rock or log, but it should also release with the slightest move.
Place your deadfalls near animal runs or in areas where they congregate, or you must use bait to entice them.
The Paiute trigger, Figure 4, and Split Stick are just a few examples of potential triggers. Several types of wood are suitable, but your surroundings may restrict more options.
The best-performing triggers are those constructed of dried wood, not green wood. When under pressure from a rock, green wood may flex and may not release as soon as dry wood.
The Figure 4 trigger is so named because it is constructed from three straight twigs and, when assembled, resembles the number “4”. The trigger is made to collapse with the slightest provocation from the animal, dropping the rock upon it.
And sure, no two stones or logs are the same, so you must develop your creativity and adjust the system to make it work.
The upright stick for the Paiute Deadfall trigger features a V-shaped carving on the upper end, on which the diagonal stick sits. The upright stick is encircled by the diagonal stick’s cordage, fastened to a short stick. The tiny stick at the end of the cordage is held in place by the bait stick until an animal activates it.
The split stick deadfall trigger has a higher possibility of tripping when a prey contacts the bait stick and requires a lot less carving of angles and cuts than the figure 4 trigger arrangement.
The notch or cut made into the bait stick to retain the two split sticks is crucial to the arrangement. The notch has to fit snugly but not too tightly. There should be some play in it.
Are Deadfall Traps Legal?
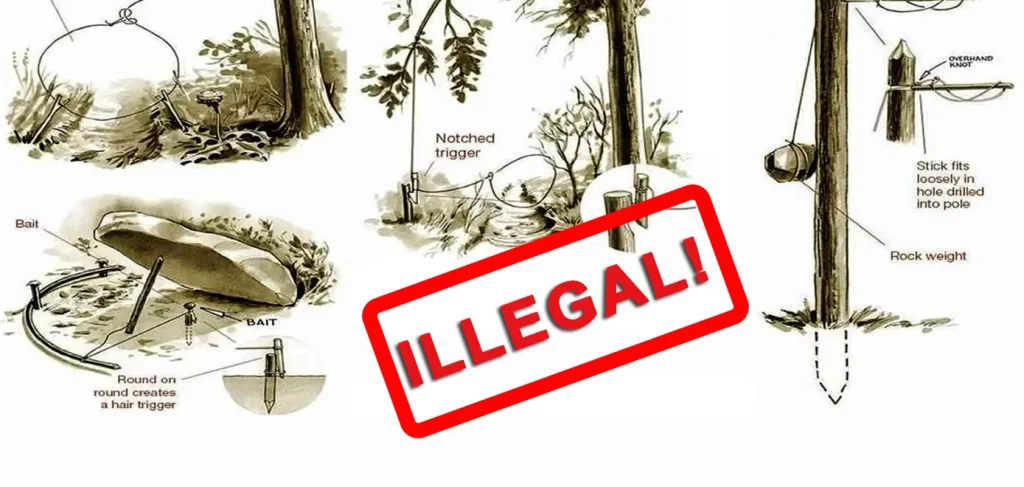
Primitive animal snares and traps used for survival hunting are prohibited in many places. For those they are allowed, one must have a license comparable to a hunting license. Ensure you abide by local laws and know the rules surrounding using snares and traps in your area.
Making your traps non-lethal will allow you to practice utilizing snares and traps even if trapping is prohibited in your state. By placing stopper sticks in the ground to catch deadfalls before they crush an animal, deadfalls are considered non-lethal.
Specific trapping devices, such as pits, pitfalls, nets, traps, deadfalls, poison, etc., are forbidden under Wyoming law. It is not permitted to kill, use bait for a trap, or poison any wildlife or game animal.
Conclusion
Building a deadfall trap is a great way to put your survival skills to the test. The Figure 4, Paiute and Split Stick deadfall traps are efficient at capturing small to medium-sized animals and are all relatively simple to build.
With some forethought and preparation, you can create a deadfall trap that is inexpensive and effective to catch small game animals.